


SKU 93601 For technical questions please call 1-800-444-3353. Page 4
Assembly
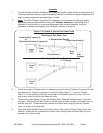
1. Though the Dust Collector Accessory Kit is designed to offer a wide variety of applications, the
following illustration depicts a typical assembly method to hook-up one power equipment tool
and two power equipment tools-see Figure 1 below.
2.
Note: The Dust Collector Accessory Kit is designed to be attached to stationary power
equipment tools and dust collectors having 4” diameter dust ports. Depending on the
diameter of the dust port of your power equipment tools and dust collector, it may be
necessary to attach size adapters (not included) to ensure a proper fit.
3. Check the length of Flexible Hose (1) needed to set up the Dust Collector Accessory Kit with
your power tool. It may be necessary to cut the Flexible Hose (1). To cut the Flexible
Hose (1), cut the plastic on the hose in a straight line between one coil of wire. Use a tin
snip or wire cutter to cut the coil inside the hose.
4. Place a Wire Hose Clamp (6) over the Flexible Hose. Slide the Flexible Hose (1) onto the
dust port. Slide the Wire Hose Clamp (6) so that it sits on both a section of Flexible Hose (1)
and the dust port. Thread down the screw on the Wire Hose Clamp (6) until the Flexible
Hose (1) is tight on the dust port.
5. Open and close the Blast Gate (2) to control the air flow from the Power Tool(s) to the dust
collector. When this kit is attached to 2 power tools, always close the Blast Gate (2) of an
unused dust collector hose.
Power
Tool
Power
Tool
Dust
Port
Jointer Hood (6” square) (3)
or
Table Saw Dust Hood (12’ square) (5)
4” Diameter Blast Gate (2)
Flexible Hose (1)
4” Wire Hose Clamp (6)
Dust
Port
Dust
Collector
“Y” Fitting (4)
Figure 1-To Attach to One or Two Power Tools
Attaching to Two Power Tools
Attaching to One Power Tool