


SKU 93742 For technical questions, please call 1-800-444-3353. Page 6
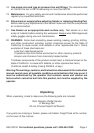
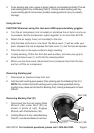
Removing Backing Pad (31)
1. Disconnect tool from air supply. Slide
Wrench (36) under Skirt (30) as
shown in photo at right. Engage
Wrench with Pad Retainer (38).
2. Holding Wrench firmly, rotate Backing
Pad (31) counterclockwise to remove.
3. Press sanding pad onto a piece of scrap material, and operate tool briefly. This will
seat sanding pad firmly on Backing Pad (31). Failure to seat sanding pad may
cause sanding pad to come loose, possibly causing personal injury or property
damage.
Using the tool
CAUTION: Whenever using this tool wear ANSI approved safety goggles.
4. Turn the air compressor (not included) on and allow the air tank to come up
to pressure. Set the compressor output regulator to no more than 90 PSI.
5. Attach the air supply hose (not included) to the tool.
6. Grip the base of the tool in one hand. The Valve Lever (1) will be under your
palm. Squeeze the tool to depress the Valve Lever (1) and the tool will operate.
7. Place the tool on the work surface to begin sanding.
8. To stop sanding, lift the tool from the work surface, and relax your grip to
allow the Valve Lever (1) to lift into the closed position.
9. When you are done work, disconnect the air pressure hose from the tool,
and turn off the air compressor.
Removing Sanding pad
1. Disconnect air pressure hose from tool.
2. Hold tool with sanding pad upward. Peel sanding pad from Backing Pad (31).
NOTE: Do not store tool with sanding pad in place. Heat generated during
sanding may cause pad to bond to Backing Pad, making subsequent removal
difficult.
Wrench (36)
Skirt (30)
Backing Pad (31)