


(Due to continuing improvements, actual product may differ slightly from the product described herein.)
NOTE: Some parts are listed and shown for illustration purposes only, and are not
available individually as replacement parts.
SKU 94137 For technical questions, please call 1-800-444-3353 PAGE 3
THE MANUFACTURER AND/OR DISTRIBUTOR HAS PROVIDED THE PARTS LIST AND ASSEMBLY DIAGRAM IN THIS MANUAL AS A
REFERENCE TOOL ONLY. NEITHER THE MANUFACTURER OR DISTRIBUTOR MAKES ANY REPRESENTATION OR WARRANTY OF
ANY KIND TO THE BUYER THAT HE OR SHE IS QUALIFIED TO REPLACE ANY PARTS OF THE PRODUCT. IN FACT, THE MANUFACTURER
AND/OR DISTRIBUTOR EXPRESSLY STATES THAT ALL REPAIRS AND PARTS REPLACEMENTS SHOULD BE UNDERTAKEN BY
CERTIFIED AND LICENSED TECHNICIANS, AND NOT BY THE BUYER. THE BUYER ASSUMES ALL RISKS AND LIABILITY ARISING OUT
OF HIS OR HER REPAIRS TO THE ORIGINAL PRODUCT OR REPLACEMENT PARTS THERETO, OR ARISING OUT OF HIS OR HER
INSTALLATION OF REPLACEMENT PARTS THERETO.
PLEASE READ THE FOLLOWING CAREFULLY
7. Connect the Split Y-Style Harness (3) Plug to the Color Coded Trunk Harness (4) Plug.
(See Assy. Diagram)
8. Turn on the towing vehicle’s headlights. The two Stop-Turn-Tail Lights (1) should turn on. The brighter
Stop Lights should turn on only when the vehicle’s brake pedal is depressed, or when the vehicle’s turn
signal is activated (ignition key must be in its “on” position).
9. If the Light Kit fails to illuminate, check all ground connections. If the turn signals on the Light Kit do not
illuminate, check the connections between the towing vehicle’s wiring and the Color Coded Trunk Har-
ness (4). (See Assy. Diagram.)
Trailer Light Mounting And Connection:
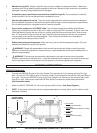
1. Mount the Stop-Tail-Turn Light (1), marked “L.H.” (with the License Window), on the left rear of the
trailer with its side marker to the outside of the trailer. Then, mount the License Plate Bracket (2) with the
Stop-Tail-Turn Light. (See Illustration on previous page)
2. Mount the Stop-Tail-Turn Light (1), marked “R.H.” (without the License Window), on the right rear of
the trailer with its side marker to the outside of the trailer. (See Assy. Diagram)
3. Use the Metal Frame Clips included in the Mounting Hardware Package (5) to mount each half of the
Split Y-Style Harness (3) down each side of the trailer. Run the YELLOW and BROWN wires down the
left side and GREEN and BROWN wires down the right side of the trailer. (See Assy. Diagram)
4. Connect the YELLOW and BROWN wires to the left hand Stop-Tail-turn Light (1) with the Wire Nut
Connectors included in the Mounting Hardware Package (5). (See Assy. Diagram)
5. Connect the GREEN and BROWN wires to the right hand Stop-Tail-turn Light (1) with the Wire Nut
Connectors included in the Mounting Hardware Package (5). (See Assy. Diagram)
6. Attach the WHITE GROUND wire to the trailer tongue or frame. (See Assy. Diagram)
Part # Description Qty. Part # Description Qty.
1 Stop-Tail-Turn Light 2 4 Color Coded Trunk Harness 1
2 License Plate Bracket 1 5 Mounting Hardware (1 package) 1
3 Split Y-Style Harness 1
1
1
2
3, 4
5: MOUNTING HARDWARE
NOT SHOWN.