


3. Maintain the Light Kit. Keep the Light Kit clean and dry for better and safer performance. Make sure
harness and all wiring remains properly attached to the trailer. Make sure light covers are not cracked or
damaged in any way; always replace them if damaged.
4. If necessary, have a qualified service technician install the Light Kit. Do not attempt to install this
product yourself if you do not feel technically competent to do so.
5. Use the right product for the job. There are certain applications for which this product was designed.
Do not use small equipment or attachments to do the work of larger industrial equipment or attachments.
Do not use this product for a purpose for which it was not intended.
6. If your trailer, camper, etc. is OVER 80” wide: You will need to install three additional Red Marker
Lights (not included) onto the rear of the unit in order to comply with DOT standards. To do so, mount the
three Red Marker Lights to the rear of the unit, making sure the Lights are no less than 6” and no more
than 12” from center of Light to center of Light. After the Lights are mounted, use wire nut connectors
(not included) to connect all three leads together. Then connect to the Brown wire in the back of
one Tail Light (either side) provided in this Kit.
7. Replacement parts and accessories: When servicing, use only idential replacement parts. Only use
accessories intended for use with this product.
8. WARNING! People with pacemakers should consult their physician(s) before using this product.
Operation of electrical equipment in close proximity to a heart pacemaker could cause interference to or
failure of the pacemaker.
9. WARNING! The warnings and precautions discussed in this manual cannot cover all possible
conditions and situations that may occur. It must be understood by the operator that common sense and
caution are factors which cannot be built into this product, but must be supplied by the operator.
ASSEMBLY INSTRUCTIONS
Vehicle Connection:
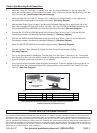
1. Connect the BROWN (B) wire of the Color Coded Trunk Harness (4) to the towing vehicle’s Tail Light
wire. Connect the YELLOW (A) wire of the Color Coded Trunk Harness to the vehicle’s Left Hand Stop &
Turn light. Connect the GREEN (D) wire of the Color Coded Trunk Harness to the vehicle’s Right Hand
Stop & Turn light. Make sure to use the BLUE Wire Splitter Connectors to make these connections.
(See Illustration below)
2. Attach the WHITE GROUND (C) wire to the towing vehicle’s frame. (See Assy. Diagram.)
3. NOTE: If the towing vehicle has rear turn signals separated from its stop lights, you will need to install
additional hardware.
SKU 94137 For technical questions, please call 1-800-444-3353 PAGE 2
A. YELLOW WIRE
(L.H. SIDE STOP/TURN SIGNAL)
B. BROWN WIRE
(TAIL LAMP, MARKER, CLEARANCE & LICENSE)
C. WHITE WIRE
(GROUND)
D. GREEN WIRE
(R.H. SIDE STOP/TURN SIGNAL)
A
D
B
C
DAB
C
D
B
D
C
B
A
A
C
COLOR CODED
TRUNK HARNESS
(4)
SPLIT Y-STYLE
HARNESS
(3)