


SKU 95498 For technical questions, please call 1-800-444-3353. Page 10
OPERATING INSTRUCTIONS
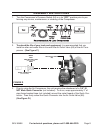
To Start The Compressor:
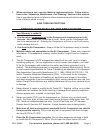
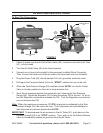
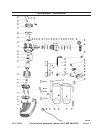
FIGURE F
AIR
OUTLET
VALVE
(68)
PRESSURE SWITCH
(64)
TANK DRAIN VALVE
(52)
SAFETY
RELEASE
VALVE
(62)
TANK
PRESSURE
GAUGE
(63)
TOOL
PRESSURE
GAUGE
(66)
REGULATOR
(67)
AIR HOSE
(NOT INCLUDED)
1. Check to make sure the Air Tank’s Drain Valve (52), located on the bottom Air Tank
(51), is fully closed.
Turn the Air Outlet Valve (68) to its closed position.2.
Connect an air hose (not included) to the previously installed Quick Connector. 3.
Then, connect the other end of the air hose to the pneumatic tool (not included).
Plug the Power Cord (55) into the nearest 120 volt, grounded, electrical outlet.4.
Pull 5. up on the Pressure Switch (64) to its “START” position to turn on the unit.
When the Tank Pressure Gauge (63) reaches at least 6. 85 PSI, turn the Air Outlet
Valve to its open position to allow air to the pneumatic tool.
Once the air pressure reaches the pneumatic tool, observe the Tool Pressure 7.
Gauge (66). Adjust the Regulator (67) to feed the proper PSI to the tool. To do so,
turn the Regulator clockwise to increase the PSI. Turn the Regulator counterclock-
wise to decrease the PSI.
Note: When the maximum air pressure, 115 PSI, is reached as indicated by the Tank
Pressure Gauge (63), the motor will stop. The Compressor will automatically re-
start when the air pressure drops below 85 PSI.
IMPORTANT: To decompress the air pressure in the Air Tanks (51), push down on the
Pressure Switch (64) to its “STOP” position. Then, pull out on the Safety Release
Valve to immediately release air pressure from the Air Tanks.