


Page 11For technical questions, please call 1‑800‑444‑3353.SKU 95630
clean and wipe down Airbrush and all
that were used during operation.
3. AFTER EVERY 500 HOURS OF
REGULAR USE, replace Compression
Ring and Inlet and Outlet Valves. Please
note: This work should only be done by
a qualied service technician.
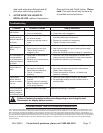
Problem Possible Causes Likely Solutions
Air Compressor
will not start.
1. No power at outlet.
2. Cord not connected.
1. Check power at outlet.
2. Check that cord is plugged in.
Pressure is low
causing a weak
spray at Nozzle of
Air Brush.
1. Air connection is leaking.
2. Air Hose is broken.
3. Screws on cylinder cover is
loose.
1. Seal air connection with plumbers tape, (only for
non-ammable type connections).
2. Replace air connection if necessary.
3. Tighten Cylinder Cover screws.
Poor atomization
when using Air
Brush.
1. The air connection is leaking.
2. Paint viscosity is too thick.
3. The Air Brush nozzle is
plugged or dirty.
1. Make sure all air connections are “air-tight”.
2. Add correct solvent for type of paint you are using
and mix thoroughly.
3. Wash the Air Brush nozzle or change it if necessary.
Air Compressor is
running well but
no air pressure is
being delivered to
Air Brush.
1. Valve plate is unscrewed or
out of place.
2. Retainer ring is destroyed by
continued use.
1. Open the front cover and tighten all screws while
making sure the valve plate is in the correct position.
2. Replace the retainer ring if necessary.
The Compressor
motor does not
work.
1. Electric cord is broken.
2. Connections inside the
compressor are defective.
3. The on - off switch is
defective.
1. Check the electric cord and replace it if necessary.
2. Open the rear plate and check the connections.
Repair them if necessary.
3. Check the operation of the on - off switch and
replace if necessary.
Compressor
motor makes a
sound, but does
not run.
1. Exhaust outlet is totally
blocked.
2. Cylinder valve is incorrectly
tted. Possibly it is mounted
in the wrong direction.
1. Open the outlet cap and unblock the exhaust.
2. Re-assemble making sure the cylinder valve is
correctly tted.
The Compressor
motor runs but is
making irregular
or knocking noise.
Bearing is loose or damaged. Replace the bearing if necessary.
Follow all safety precautions whenever diagnosing or servicing the tool.
Disconnect air supply before service.
Troubleshooting
PLEASE READ THE FOLLOWING CAREFULLY
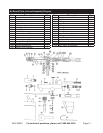
THE MANUFACTURER AND/OR DISTRIBUTOR HAS PROVIDED THE PARTS LIST AND ASSEMBLY DIAGRAM IN THIS MANUAL AS A REFERENCE TOOL
ONLY. NEITHER THE MANUFACTURER OR DISTRIBUTOR MAKES ANY REPRESENTATION OR WARRANTY OF ANY KIND TO THE BUYER THAT HE OR
SHE IS QUALIFIED TO MAKE ANY REPAIRS TO THE PRODUCT, OR THAT HE OR SHE IS QUALIFIED TO REPLACE ANY PARTS OF THE PRODUCT. IN
FACT, THE MANUFACTURER AND/OR DISTRIBUTOR EXPRESSLY STATES THAT ALL REPAIRS AND PARTS REPLACEMENTS SHOULD BE UNDERTAKEN
BY CERTIFIED AND LICENSED TECHNICIANS, AND NOT BY THE BUYER. THE BUYER ASSUMES ALL RISK AND LIABILITY ARISING OUT OF HIS OR HER
REPAIRS TO THE ORIGINAL PRODUCT OR REPLACEMENT PARTS THERETO, OR ARISING OUT OF HIS OR HER INSTALLATION OF REPLACEMENT
PARTS THERETO.