


13. STAY ALERT. Watch what you are doing. Do not operate Lathe or assemble or setup this Stand when
you are tired.
14. DO NOT ASSEMBLE WHILE UNDER THE INFLUENCE OF ALCOHOL, DRUGS, OR
PRESCRIPTION MEDICINES.
15. CHECK FOR DAMAGED PARTS. Before using any tool, any part that appears damaged should
be carefully checked to determine that it will operate properly and perform its intended function. Check for
alignment and binding of moving parts, any broken parts or mounting fixtures, and any other condition that
may affect proper operation. Any part that is damaged should be properly repaired or replaced by a
qualified technician. Do not use the tool if any switch does not turn on and off properly.
16. REPLACEMENT PARTS AND ACCESSORIES. When servicing, use only identical replacement
parts intended for use with this tool. Replacement parts are available from Harbor Freight Tools. Use of any
other parts will void the warranty.
ASSEMBLY INSTRUCTIONS
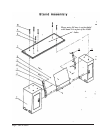
PLEASE REFER TO THE ASSEMBLY DIAGRAM AND PARTS LIST ON PAGES 6 AND 7 OF
THIS MANUAL AND TO THE MANUAL FOR THE 43681 LATHE
1. Position the Headstock Stand (1) and Tailstock Stand (11) on the shop floor. Place the Headstock
Stand (1) on the left, and Tailstock (11) on the right in the position you intend to operate the
machine. Be sure the doors face front.
2. Using the included hardware, fasten the Headstock Connecting Strip (2) to the Headstock Stand
(1) and the Tailstock Connecting Strip (12) to the Tailstock Stand (11). Then fasten the Connect
ing Plate (4) to the two stands.
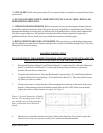
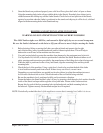
3. Compare the center-to-center distance of the mounting holes in the tops of the stands to the same
distance of the mounting holes in the headstock and tailstock of the 43681 Lathe (not included).
Adjust the stands so these distances are equal. See Figure 1
4. Check to be sure that the stands are level and stable on the shop floor. If you need to repair the
floor, do it now to be sure you have a solid, level surface to mount the machine.
Page 4 SKU # 95647
Figure 1. Overall dimensions of Lathe’s
oil tray. The mounting holes on the oil
tray should aling with the mounting
holes on Headstock and Tailstock
Stands.