


SKU 95838Page 12
For technical questions, please call 1-800-444-3353.
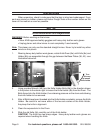
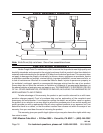
Dust Bag and Exhaust Direction Lever: 4.
The Exhaust Direction Lever (55) controls the dust port that the dust blows out of.
Turn it to the right to direct the exhaust right, and left to direct the exhaust left. Do
not position the Lever between settings, the dust will come out of both ports.
Connect either the Dust Bag (46) or a different dust collection system (not included)
to the dust port that the exhaust is being directed to.
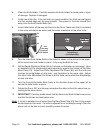
Rabbet Depth Guide: 5.
This is used to set the final cut depth when cutting a rabbet. Set the depth gauge
to the desired depth, and then use the Fence to determine the desired width. You
may wish to double-check the gauge’s accuracy with a ruler (sold separately). The
Rabbet Depth Guide (17) should only be attached to the Right Housing (16). The
Rabbet Depth Guide rests on the unplaned surface of the wood and helps to main-
tain an even, consistent depth.
Depth Adjustment Knob and Depth Knob Scale: 6.
The Depth Adjustment Knob (24) is used to control the amount of material that is
removed in one pass. Turn the Knob so that the triangle on the Front Cover (29)
lines up with the desired setting on the Depth Knob Scale (25). The scale has metric
measurements on top (from 0 - 2 mm) and SAE measurements on the bottom (from
0 - 5/64”). The knob should be turned back past the 0 marking to the P (park) after
the planer is used. This will push the knife slightly away from the surface the planer
is resting on and will help prevent the planer from lurching forward if it is accidentally
turned on.
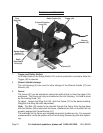
OPERATION
Thickness Planing
WARNING! Always wear ANSI-approved safety goggles and a NIOSH-approved dust
mask or respirator along with heavy-duty work gloves when operating this tool.
Make sure the Trigger (48) is released and the Planer is unplugged before making
any adjustments to Planer or planer attachments.
Support the workpiece using bench mounted clamps or a vise, or another safe, 1.
practical way.
Adjust the planer’s Depth Adjustment Knob (24) and Fence (37) to the desired set-2.
tings.
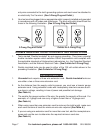
While keeping fingers well away from both Trigger (48) and knife opening, connect 3.
power cord to grounded 120 V~ outlet.
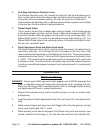
While standing to the 4. side of workpiece, hold Planer firmly with one hand on rear
handle, molded in the Housing (3, 16), and with other hand on Front Handle (26).