


Page 8SKU 97055 For technical questions, please call 1-800-444-3353.
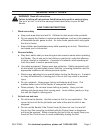
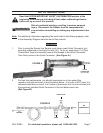
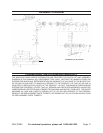
3. To install a Sanding Belt, loosen the Belt Tensioning Screw (41) located on the
Adjusting Bar (36). Place the belt over the Belt Wheel (44). Push the Belt Wheel
(44) against the work bench to collapse the Adjusting Bar (36), allowing the belt
to attach over the Driving Belt Wheel (47) at the motor end. Manually rotate the
belt to make sure that it is centrally located on the two belt wheels. Make sure
the Belt Wheel (44) center screw is tight at all times. (See Figure C.)
FIGURE C
SANDING BELT
BELT TENSIONING SCREW (41)
ADJUSTING BAR (36)
BODY (1)
BELT
WHEEL
(44)
BELT
WHEEL
(47)
4. Loosen the Clamp Screw (52) with the supplied Hex Wrench (51). Rotate the
Adjusting Bar (36) to the desired position and tighten the Clamp Screw (52).
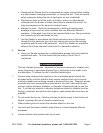
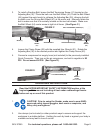
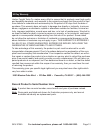
5. Connect a compressed air supply hose (not included) to the previously installed
Quick Connector. Then turn on the air compressor, and set its regulator to 90
PSI. Do not exceed 90 PSI. (See Figure D.)
FIGURE D
AIR
SUPPLY
HOSE
(NOT INCLUDED)
OPERATING INSTRUCTIONS
Read the ENTIRE IMPORTANT SAFETY INFORMATION section at the
beginning of this manual including all text under subheadings therein
before set up or use of this product.
1. CAUTION! Prior to using the Sander, make sure to wear ANSI-
approved safety impact goggles, dust mask or respirator, and
heavy duty work gloves.
2. Use clamps (not included) or other practical ways to secure and support the
workpiece to a stable platform. Holding the work by hand or against your body is
unstable and may lead to loss of control.
CLAMP SCREW (52)