


SKU 90725 Page 5
Operation
WARNING: Never allow the laser light or its reflection to shine
directly into the eyes of any person or animal.
Severe eye injury may result.
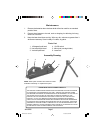
1. Determine the intended use of the level, and optionally install the tripod,
if it will be needed.
2. Align the laser level as required, observing the vertical, horizontal or 45
degree spirit levels. These will indicate the relative position of the laser
level to actual level.
3. When the laser level is correctly positioned, turn on the laser by depress-
ing the On/Off switch at the end of the level. Recheck the spirit levels to
be sure the laser level has not been moved.
4. Mark the desired measurement, then turn the laser off by depressing the
On/Off switch.
Using the level to equalize height of distant components: For
example: If you wish to install cement footings for a storage shed, first determine
the desired height of any one of the footings. Align the laser beam with the top
surface of the reference footing, and assure that the liquid level on top of the laser
level is at level with the ground. Now direct the laser beam toward each of the
remaining footing locations. On reference stakes at those locations, mark the spot
that the laser illuminates. This indicates the desired top surface of that footing.
This technique can be used for many similar applications, for example to align
pictures on a wall.
Using the level to install horizontal or vertical components: For
example: To install a chair rail on an interior wall, first mark the desired height of
the rail. Align the laser level with that point, and assure that the liquid level
indicates level with the floor. Shine the laser light on the adjoining wall, and have
an assistant mark that location. Now install the chair rail in a direct line between
the two points. This same technique can be used to install vertical or 45 degree
angle components.
Using the level to check slope: For example: To determine the slope
of a floor, place the laser level at one end of the floor, using the tripod. Assure that
the laser is level to the ground by observing the liquid level on the top. Measure
the vertical drop from the laser lens to the floor surface. Shine the laser light on a
ruler held vertical at the other end of the floor. The difference in these measure-
ments is the amount of slope in the floor. This technique can also be used to
design slope, such as when constructing an outdoor surface which will require a
run-off slope.
Your laser level is a versatile tool. The above suggestions are only a few
of the many uses you will discover for this tool.
90725 Laser Level.P65 10/13/03, 9:06 AM5