


Page 4SKU 93884 For technical questions, please call 1-800-444-3353
Operation
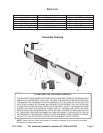
Refer to the Assembly Drawing on Page 6.
Using the Horizontal and Vertical Vials (9 and 10).
The vials on the level can be read by observing the bubble within. If the bubble is
centered in between the lines, then the Vial is level.
Using the level with the Laser.
1. Before each use, press the Calibration Button (7) and hold it for a few seconds until
the display reads Zero. You may use a known level surface or another level to assist
you with Zero calibration.
Each Button on the unit functions as listed below:
On/Off Button (4) - This button turns on and off the LCD (3).
Preset Angle Button (5) - Pressing and holding down this button will lock the digital
reading in the display, making it easy to move the level to get a closer look at the
reading.
Gradient Button (6) - This button translates degree reading into a percentage from
Zero to 100 percent. When the degree is within 0 to 45, the percentage will be the
degree measured, divided by 45. When the degree is within the range between 45
and 90, then the percentage will be 90 minus the degree measured, divided by 45.
Hold/Display Button (8) - This button has two features. First, if you push the button
for one second, it allows the Level to emit an audible beep when the level is either at
zero or ninety degrees. Secondly, if you hold the button down for five seconds, it will
light up the display.
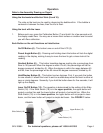
Laser On/Off Button (12)
- The operation is determined by the setting of the Slide
Switch (18). If the Slide Switch (18) is in the upper position, the upper button will
project a vertical line and the lower button will project a horizontal line. When the
Slide Switch (18) is in the lower position, the upper button will not project a laser
beam, and the lower button will project a simple dot beam. See FIGURE 1 below.
Lower Button (12)
Upper Button (12)
FIGURE 1
Slide Switch (18)