


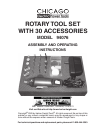
Page 4SKU 94076
For technical questions, please call 1-800-444-3353.
6. If the bit or accessory bogs down or becomes jammed, make sure to turn off the switch and unplug from the
power source before clearing the bit or accessory.
7. Always feed the accessory or bit in the proper direction. Feed in the direction that the cutting edge is exiting
the workpiece (that is the same direction chips are thrown).
8. Always bring the tool up to speed before contacting the material.
9. Make sure there are no foreign objects, such as nails, in your workpiece.
10. Don’t use dull or damaged bits. Dull or damaged bits may break off and cause serious injury. Replacement
accessories are available at Harbor Freight Tools.
11. After changing bits or accessories, make sure the collet is securely fastened.
12. Any accessory used with this tool must be rated at 16,250 RPM or greater.
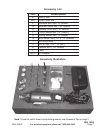
Unpacking
When unpacking, check to make sure the parts listed on page 6 and 8 are included. If any parts are missing
or broken, please call Harbor Freight Tools at the number on the cover of this manual as soon as possible.
Operation
Note: Always disconnect the tool from the power adapter while loading, unloading, or adjusting accessories.
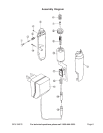
1. Choose the appropriate Collet (7) for the shank of the accessory you are using.
2. Just above the collet shaft on the end of the tool, there is a shaft lock button. Depress that button to lock the
shaft so that you can open the Collet (7).
3. Remove the Collet Nut (6) on the tip of the tool and add the appropriate Collet (7). Put the bit or accessory
you want in the Collet (7). Continue to depress the shaft lock button while tightening the Collet Nut (6).
4. Make certain that the power switch is in the off (O) position. Plug the Adapter (13) into a properly grounded,
120 VAC outlet. Connect the plug from the Rotary Tool (1) to the connector on the end of the adapter’s cord.
5. Hold the tool firmly in one hand. Turn the toggle switch on ( I ) and wait until the tool reaches full speed before
contacting the workpiece.
6. When finished, turn off (O) the toggle switch and unplug the unit.
Operational Tips.
1. When you turn on the tool, hold it a safe distance in a direction away from your face.
2. Practice on scrap material while getting use to the feel of the tool.
3. Never lean on the tool. Allow the speed of the tool to do the work for you. Lightly contact the material. It is
better to make several passes on a workpiece than to try to remove a lot of material in one pass. A gentle
touch works best. If you feel the job is not getting done, change to a more powerful cutter.
4. Plastics and similar materials will melt when contacted with high speed accessories. Start very slowly and
monitor the material carefully.
5. Follow all warnings and safety precautions and operational warnings as outlined in this manual completely.
Accessory Tips. (Some of the many uses.)
1. Mandrels are the shanks with a threaded or screw head. They are required when you use the cutoff wheels,
polishing wheels, and sanding discs. The mandrel without the nut on the end is for the felt polishing wheels.
For cutoff wheels and sanding discs, remove the nut on the end of the mandrel, add the wheel or disc, and
replace the nut.
2. Cutters are used for cutting, carving and slotting materials.
3. Grinding Stones are used for sharpening cutting tools, screwdrivers etc. They can also be used to deburr
any metal after the cutting process. Also, they can be used to remove excess glaze on ceramics.
4. Cutting Wheels are used for slicing or cutting off bolt heads, nuts, etc.
5. Wire Brushes clean silverware, jewelry, and antiques.