


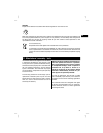


CAUTION
Wear protective gloves when changing blades. The
blade, the clamping flange and the clamping screw
get hot.
CAUTION
Check that the blade to be fitted complies with
the technical requirements and that it is well
sharpened. A sharp saw blade is an essential re-
quirement for a perfect cut.
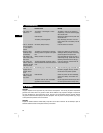
7.1.1 Removing the saw blade 2
1. Pull the battery out of the power tool.
2. Press the drive spindle lockbutton.
3. Turn the saw blade clamping screw with the hex.
socket wrench until the locking pin engages fully.
4. Use the hex. socket wrench to release the clamp-
ing screw by turning it counterclockwise.
5. Remove the clamping screw from the outer
clamping flange.
6. Open thepivoting guard by swinging it to theside
and then remove the saw blade.
7.1.2 Fitting the saw blade 3
1. Pull the battery out of the power tool.
2. Clean the mounting flange and the clamping
flange.
3. Fit the mounting flange.
4. Open the pivoting guard.
5. Fit the new saw blade (observe the direction of
rotation arrow on the blade).
6. Fit the outer clamping flange.
7. Secure the clamping flange by tightening the
clamping screw in a clockwise direction. When
doing so, press the spindle lockbutton as before
(see “Removing the blade”).
8. Before using the power tool, check that the saw
blade is securely attached.
7.2 Adjusting the riving knife 4
Check to ensure that the riving knife is adjusted
correctly. The gap between the riving knife and the
teeth of the blade should be no more than 5 mm and
the teeth should project no more than 5 mm below
the lower edge of the riving knife.
The riving knife prevents the blade sticking when
making longitudinal cuts. The saw may therefore be
used only when the riving knife is correctly fitted and
adjusted.
1. Pull the battery out of the power tool.
2. Release the hex. socket screw with a hex. socket
wrench.
3. Adjust the r ivingknife asshown inthe illustration.
4. Tighten the hex. socket screw with a hex. socket
wrench.
7.3 Adjusting the cutting depth 5
NOTE
The cutting depth set should always be approx. 5 to
10 mm greater than the thickness of the material to
be cut.
Thecuttingdepthcanbeadjustedstepplesslybetween
0and55/70mm.
1. Pull the battery out of the power tool.
2. Place the power tool on a supporting surface.
3. Release the cutting depth adjustment clamping
lever
The depth set can be read from the scale at the
arrow on the guide.
4. Lift the power tool in a scissor movement and set
the desired cutting depth by closing the clamping
lever.
7.4 Adjusting the cutting angle 6
The power tool can be set to any angle between 0
and 45| for bevel cuts. Angles of up to 50° can be set
after lifting the angle extender.
1. Pull the battery out of the power tool.
2. Release the cutting angle adjustment clamping
lever.
3. Pivot the power tool into the desired position or,
respectively,liftthe angleextenderto allowangles
up to 50° to be set.
4. Tighten the cutting angle adjustment clamping
lever.
7.5 Sawing along a line
There is a cutting line indicator for straight cuts or
bevel cuts (0° and 45°) at the front section of the
base plate of the power tool. This permits precise
cuts to be made at the selected cutting angle. The
edge of the line indicator corresponds to the inside of
the saw blade. The viewing window provides a better
view of the cutting line and thus ensures a better cut.
Additional cutting line indicators are located at the
en
27