


6
en
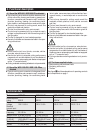
5. Assembly
-NOTE-
The electric supply voltage must comply with the infor-
mation on the type plate.
If extension cords are used: Use only extension cords
of a type approved for the intended purpose and of ade-
quate cross section. Failure to observe this point may
result in reduced performance and may cause the cord
to overheat. Replace damaged extension cords. Use only
correspondingly marked and approved extension cords
for working outdoors. Recommended minimum cross
sections and max. cord lengths:
Mains Conductor cross section AWG
voltage 1.5 mm
2
2.5 mm
2
14 12
110–120 V 20 m 40 m 75 ft 125 ft
230 V 50 m 100 m – –
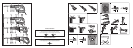
5.1 Fitting the saw blade Ẉ
1. Unplug the supply cord from the electric socket.
2. Check that the connection end of the blade is clean.
The blade clamp should also be kept clean. Use only
saw blades with
1
/
2
″ connection ends ẗẍ.
3. Turn the blade clamp locking sleeve in a counter-
clockwise direction and hold it in this position.
4. Push the saw blade into the blade clamp.
5. Release the locking sleeve and allow it to move back.
It should be heard to engage.
6. Check that the clamp has engaged by pulling on the
blade.
5.2 Removing the saw blade ẉ
1. Unplug the supply cord from the electric socket.
2. Turn the blade clamp locking sleeve in a counter-
clockwise direction and hold it in this position.
-CAUTION-
● The cutting edges of the saw blade
are sharp.
● The cutting edges may present a risk
of injury.
● Moving parts may present a risk of
injury.
● Wear protective gloves.
3. Pull the blade out of the clamp toward the front of the tool.
4. Release the locking sleeve.
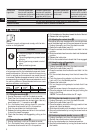
5.3 Adjusting the contact shoe Ẍ
The contact shoe can be adjusted to provide optimum
use of the blade length and to improve access in corners.
1. Unplug the supply cord from the electric socket.
2. Remove the saw blade (see 5.2).
3. Press the contact shoe lockbutton and hold it in this
position.
4. Slide the contact shoe forward or back into the desired
position.
5. Release the lockbutton.
6. Pull on the contact shoe to check that it has engaged.
5.4 Using the pipe cutting adaptor
(accessory) ẗẘ ẗẏ ẗẐ
1. Unplug the supply cord from the electric socket.
2. Remove the saw blade (see 5.2).
3. Press the contact shoe lockbutton and hold it in this
position.
4. Pull the contact shoe away from the tool toward the
front.
5. Push the pipe cutting adaptor into the tool from the
front until it is in the desired position.
6. Release the lockbutton.
7. Pull on the pipe cutting adaptor to check that it has
engaged.
8. Open the screw clamp to the maximum position.
9. Place the adapter chain around the pipe, locking the
chain to the fitting.
-NOTE- The handle should be at a 45° angle.
5.5 Fitting the side handle (accessory) ẗẑ
1. Unplug the supply cord from the electric socket.
2. Remove the saw blade (see 5.2).
3. Place the adaptor around the front grip section from
above and close the adaptor.
4. Slide the side handle onto the adaptor from the front.
5. Secure the side handle by turning the screw knob on
the handle.
5.6 Positioning the side handle (accessory) ẗẒ
1. Unplug the supply cord from the electric socket.
2. Slacken the screw knob on the side handle.
3. Bring the side handle into the desired position.
4. Secure the side handle by turning the screw knob on
the handle.
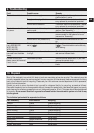
Stroke rate Constant-speed elec- Constant-speed elec- Constant-speed elec- Constant-speed elec-
regulation tronics with variable tronics with variable tronics with variable tronics with variable
stroke rate, stroke rate stroke rate, stroke rate stroke rate stroke rate, stroke rate
regulator with 6 pos. regulator with 6 pos. regulator with 6 pos.
Blade clamp Keyless, for standard
1
/
2
″ blades
Orbital action on / off (only WSR900-PE / WSR1250-PE / WSR1400-PE)
Double insulated Protection class II (double insulated) Z
Right of technical changes reserved