


16
English
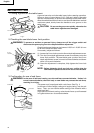
4. Miter cutting procedures
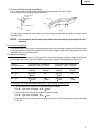
(1) Loosen the side handle.
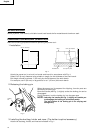
(2) Adjust the table until the indicator aligns with the desired setting
on the miter angle scale as shown in Fig. 18.
(3) Re-tighten the side handle to secure the table in the desired
position.
CAUTION: Never remove the side handle; use of the tool without it would be hazardous.
To prevent an accident or personal injury always firmly tighten the miter handle.
NOTE: * Positive stops are provided at the right and left of the 0° center setting, at 15°, 22.5°, 31.6°,
35.3°, 45° and 60° right and 15°, 22.5°, 31.6°,35.3° and 45° left settings.
Check that the miter angle scale and the tip of the indicator are properly aligned.
* Operation of the power tool with the miter angle scale and indicator out of alignment, or
with the miter handle not properly tightened, will result in poor cutting precision.
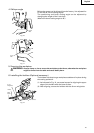
5. Bevel cutting procedures
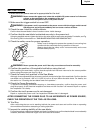
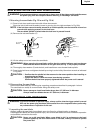
(1) Loosen the clamp lever and bevel the saw blade to the left.
(2) Adjust the bevel angle to the desired setting while watching
the bevel angle scale and indicator, then secure the clamp lever
(Fig. 19).
WARNING: When the workpiece is secured on the left side of the blade, the short cut-off portion
will come to rest on the right side of the saw blade. Always turn the power off and let
the saw blade stop completely before raising the handle from the workpiece.
If the handle is raised while the saw blade is still rotating, the cut-off piece may
become jammed against the saw blade causing fragments to scatter about
dangerously.
6. Compound cutting procedures
For compound cutting, follow the instructions in paragraphs 4 and 5 above. At a bevel angle of 45° and
a miter angle of 45°, a workpiece of 1-5/8" (41 mm) in height and up to 4" (102 mm) in width can be cut.
CAUTION: Always secure the workpiece with the right hand side for compound cutting. Never
rotate the table to the right for compound cutting, because the saw blade might
then contact the clamp or vise that secures the workpiece, and cause personal injury
or damage.
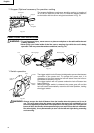
Fig. 18
Tighten
Loosen
Side
Handle
Miter Angle
Scale
Indicator
Turn the
Turn Table
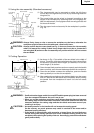
Fig. 19
Clamp
Lever
Indicator
Bevel Angle
Scale