


English
17
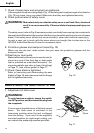
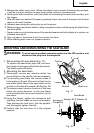
5. Release the safety cover lever. When the safety cover contacts the work piece surface,
it will be in proper position to open freely when cutting is commencend.
6. Holding the saw in position, with the blade not contacting the work piece surface, pull
the trigger.
7. After the saw has reached full speed, gradually lower rear end of the saw until its base
rests on the work surface.
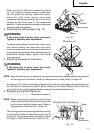
8. Advance saw along the cutting line up to the corner.
9. Release trigger and allow blade to stop completely before withdrawing the blade from
the work piece.
⅙ Never under any circumstances pull the saw backwards while the blade is in motion, as
kickback may result.
10. Use a jig saw or hand saw to cut the corners out clean.
11. When starting each new cut, repeat as above.
MOUNTING AND DISMOUNTING THE SAW BLADE
WARNING: To avoid serious accident ensure the switch is in the OFF position, and
disconnect the plug from the receptacle.
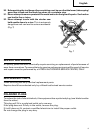
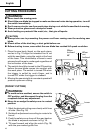
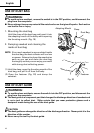
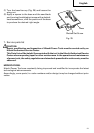
1. Dismounting the saw blade (Fig. 17)
To replace the saw blade, push the lock lever,
then loosen the hexagonal bolt with the wrench.
The blade comes off easily.
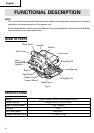
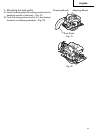
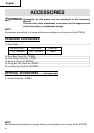
2. Mounting the saw blade
(1) Thoroughly remove any sawdust which has
accumulated on the spindle, bolt and washers.
(2) For mounting saw blade, the concave sides of
both washers (A) and (B) must be fitted to the
saw blade sides. Mount the saw blade on the
spindle, and finally affix washer (B) (See Fig. 18)
(3) To assure proper rotation direction of the saw
blade, the arrow direction on the saw blade
must coincide with the arrow direction on the
saw cover.
(4) Using the fingers, tighten the hexagonal bolt
retaining the saw blade as much as possible.
Then depress the lock lever, lock the spindle,
and thoroughly tighten the bolt.
(5) Confirm that the lock lever is in the original
position.
Fig. 18
Hexagonal
Flange Bolt
Washer (A)
Washer (B)
Saw Blade
Fig. 17
Lock Lever
Wrench
Loosen
Tighten