


English
16
CAUTION:
●
Exercise care not to excessively prolong driving
time, otherwise, the screws may be damaged by
excessive force.
●
Apply the rotary hammer perpendicularly to the
screw head when driving a screw; otherwise, the
screw head or bit will be damaged, or driving force
will not be fully transferred to the screw.
●
Do not attempt to use the rotary hammer in the
rotation and striking mode with chuck adaptor (D)
and bit attached.
5. Hammering only
Align the “ ” mark with the “ ” mark by
rotating the change lever to set the “Hammering
only” function. (Fig. 12)
(1) Mount the bull point or cold chisel.
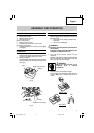
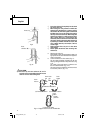
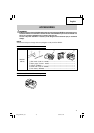
6. When driving wood screws (Fig. 15)
(1) Selecting a suitable driver bit
Employ plus-head screws, if possible, since the
driver bit easily slips off the heads of slotted-head
screws.
(2) Tightening wood screws
⅜
Prior to tightening wood screws, make pilot holes
suitable for them in the wooden board. Apply the
bit to the screw head grooves and gently drive the
screws in the holes.
⅜
After rotating the rotary hammer at low speed for
a while until a wood screw in partly driven into
the wood, squeeze the trigger more strongly to
obtain the optimum driving force.
CAUTION:
Exercise care in preparing a pilot hole suitable for
the wood screw taking the hardness of the wood
into consideration. Should the hole be excessively
small or shallow, requiring much power to drive
the screw into it, the thread of the wood screw
may sometimes be damaged.
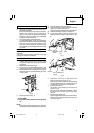
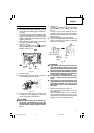
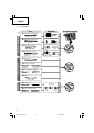
7. Using depth gauge (Fig. 16)
(1) Loosen the knob on the side handle, and insert the
depth gauge into the mounting hole on the side
handle.
(2) Adjust the depth gauge position according to the
depth of the hole and tighten the knob bolt securely.
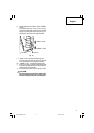
8. How to use the drill bit (taper shank) and the taper
shank adapter
(1) Mount the taper shank adapter to the rotary
hammer. (Fig. 17)
(2) Mount the drill bit (taper shank) to the taper shank
adapter. (Fig. 17)
(3) Turn the switch ON, and drill a hole to prescribed
depth.
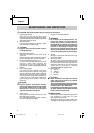
(4) To remove the drill bit (taper shank), insert the
cotter into the slot of the taper shank adapter and
strike the head of the cotter with a hammer
supporting on the rest. (Fig. 18)
Fig. 15
Socket
Chuck
adaptor (D)
Front cap
Grip
Bit
Fig. 16
Mounting hole
Depth gauge
Side handle
Fig. 17
Drill bit
Taper shank
adapter
Cotter
Rests
Fig. 18
Taper shank
adapter
01Eng_DH25DAL_US 9/14/07, 20:3916