


7
English
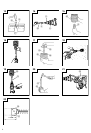
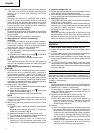
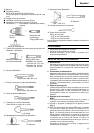
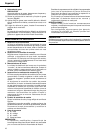
5. Install the stopper (Fig. 10)
(1) Loosen the side handle and insert the straight portion
of the stopper into the handle bolt hole.
(2) Move the stopper to the specified position and rotate
the grip of the side handle clockwise to fix the stopper.
6. Warming up (Fig. 11)
The grease lubrication system in this unit may require
warming up in cold regions.
Position the end of the bit so makes contact with the
concrete, turn on the switch and perform the warming
up operation. Make sure that a hitting sound is
produced and then use the unit.
CAUTION
When the warming up operation is performed, hold
the side handle and the main body securely with both
hands to maintain a secure grip and be careful not to
twist your body by the jammed drill bit.
DRILLING AND DRIVING-IN OPERATIONS FOR
ANCHORS
1. When a taper shank adapter is used. (Fig. 12)
(1) Install drill bit with taper shank in the taper shank
adapter.
(2) Turn the power on and drill a base hole to the depth
sounded by indicating groove on the drill bit.
(3) After cleaning out dust with a syringe, attach the plug
to the anchor tip and drive in the anchor with a manual
hammer.
(4) To remove the drill bit (taper shank), insert the cotter
into the slot of the taper shank adapter and strike the
head of the cotter with a manual hammer supporting
on a rest. (Fig. 13)
USING DRILL CHUCK, CHUCK ADAPTER
Note that this machine can be used at “rotation only” if
separately sold parts such as drill chuck and chuck adapter
are attached. Use it with the selector lever positioned at
“rotation + hammering”.
CAUTION:
During operation, be sure to grip the handle and the
side handle firmly to prevent your body from swaying.
(1) Switching to “rotation + hammering”
For switching to “rotation + hammering”, follow the
same procedures mentioned in [3. When drilling at
“rotation + hammering”].
(2) Attaching chuck adapter to drill chuck (Fig. 14)
(a) Attach the chuck adapter to the drill chuck.
(b) The SDS max shank of the chuck adapter is
equivalent to the drill bit. Therefore, follow the
same procedure as [How to install tool] for
attaching and detaching.
(3) Drilling
(a) Even if you apply more-than-required pressure to
the machine body, drilling can never be performed
as quickly as you expect. Applying more force or
pressure to the machine body than what is needed,
on the contrary, damages the drill tip, resulting in
the declined working efficiency and shortened life
of this machine.
(b) A drill can snap sometimes when drilling is almost
finished. It is important to relax your thrusting
pressure when drilling is nearing the end.
(2) It is unnecessary to forcibly press the rotary hammer
main body. It is sufficient to slightly press the rotary
hammer to an extent that shavings are freely
discharged.
CAUTION
Although this machine is equipped with a safety
clutch, if the drill bit becomes bound in concrete or
other material, the resultant stoppage of the drill bit
could cause the machine body to turn in reaction.
Ensure that the main handle and side handle are
gripped firmly during operation.
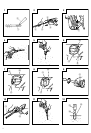
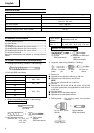
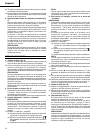
2. How to chisel or crush (Fig. 5)
By applying the drill bit tip to the chiseling or crushing
position, operate the rotary hammer by utilizing its
empty weight.
Forcible pressing or thrusting is unnecessary.
3. When drilling at “rotation + hammering”:
CAUTION:
If you switch the selector lever during motor rotation,
the tool can start to rotate abruptly, resulting in
unexpected accidents. Be sure to switch the selector
lever when the motor is at a complete stop.
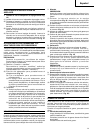
(1) Switching to “rotation + hammering”
(a) Push the button, release lock and turn the selector
lever clockwise.
(b) Align ▲ of the selector lever and
of the lever
holder as illustrated in Fig. 6.
(c) Release the button to lock the selector lever.
NOTE:
Turn the selector lever (do not push the button) to
check if it is completely locked and make sure that it
does not turn.
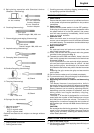
4. When chipping and chiseling at “hammering”:
CAUTION:
⅜ If the selector lever is switched during motor rotation,
the tool can start to rotate abruptly, resulting in
unexpected accidents. Make sure to switch the
selector lever when the motor is at a complete stop.
⅜ If the bull point or cold chisel is used at the position
of ”rotation + hammering”, the tool can start to rotate,
resulting in unexpected accidents. Make sure that they
are used at the position of ”hammering”.
(1) Switching to ”hammering”
(a) Push the button, release lock and turn the selector
lever counterclockwise.
(b) Align ▲ of the selector lever and
of the lever
holder as illustrated in Fig. 7.
(c) Release the button to lock the selector lever.
NOTE:
Turn the selector lever (do not push the button) to
check if it is completely locked and make sure that
it does not turn.
(2) When fixing working positions of tools such as cold
chisel, etc.,
(a) Push the button, release lock and turn the selector
lever.
Align ▲ of the selector lever and
of the lever
holder as illustrated in Fig. 8.
(b) Release the button to lock the selector lever.
(c) Turn the grip as illustrated in Fig. 9 and fix the
tool to the desired working direction.
(d)Switch the selector lever to “hammering”
according to the procedures mentioned in the
above item (1) and secure the position of the tool.