


English
10
ASSEMBLY
CAUTION: To prevent accidents, make
sure to turn the switch off and
disconnect the plug from the
receptacle.
NOTE:
When using tools such as bull points,
cutters, etc., make sure to use the genuine
parts designated by our company.
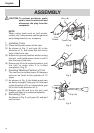
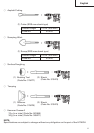
1. Installing Tools
(1) Clean the shank portion of the tool.
(2) As shown in Fig. 2, pull grip (A) in the
direction of A, and insert the tool into a
hole of the front cap.
(3) Adjust the groove position while turning
the tool, and furthermore insert it until it
hits the end of the hole.
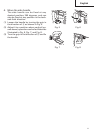
(4) Return grip (A) to its original position, pull
the tool to make sure it is locked
completely. (Fig. 3)
2. Deciding Working Position of Tool
The tool can be turned every 30 degrees
and can be fixed at the position of 12
steps.
(1) As shown in Fig. 4, the blade angle can
be freely changed if the grip (A) is turned
in the direction of B in a state where grip
(B) is slid in the direction of A.
(2) Release grip (B) and turn the tool, and
make sure that it is locked completely.
3. Removing Tool
As shown in Fig. 2, pull grip (A), and pull
out the tool.
Fig. 2
Fig. 3
Fig. 4
Grip (A)
Tool
Shank
Front Cap
A
Grip (B)
Grip (A)
A
B