


English
10
(2) Avoid recharging at high temperatures.
A rechargeable battery will be hot immediately after use. If such a battery is
recharged immediately after use, its internal chemical substance will
deteriorate, and the battery life will be shortened. Leave the battery and
recharge it after it has cooled for a while.
CAUTION:
⅜
When the battery charger has been continuosly used, the battery charger
will be heated, thus constituting the cause of the failures. Once the charging
has been completed, give 15 minutes rest until the next charging.
⅜
If the battery is recharged when it is warm due to battery use or exposure to
sunlight, the pilot lamp map light in green.
The battery will not be recharged. In such a case, let the battery cool before
charging.
⅜
When the pilot lamp flickers in red (at 0.2-second intervals), check for and
take out any foreign objects in the charger’s battery installation hole. If there
are no foreign objects, it is probable that the battery or charger is
malfunctioning. Take it to your authorized Service Center.
PRIOR TO OPERATION
1. Preparing and checking the work environment
Make sure that the work site meets all the conditions laid forth in the
precautions.
2. Checking the battery
Make sure that the battery is installed firmly. If it is at all loose it could come
off and cause an accident.
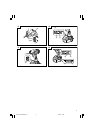
3. Installing the bit (WH14DBDL / WH18DBDL)
Always follow the following procedure to install driver bit. (Fig. 5)
(1) Pull the guide sleeve away from front of the tool.
(2) Insert the bit into the hexagonal hole in the anvil.
(3) Release the guide sleeve and it returns to its original position.
CAUTION:
If the guide sleeve does not return to its original position, then the bit is not
installed properly.
4. Selecting the socket matched to the bolt (WR14DBDL / WR18DBDL)
Be sure to use a socket which is matched to the bolt to be tightened. Using
an improper socket will not only result in insufficient tightening but also in
damage to the socket or nut.
A worn or deformed hex. or square-holed socket will not give an adequate
tightness for fitting to the nut or anvil, consequently resulting in loss of
tightening torque.
Pay attention to wear of socket hole, and replace before further wear has
developed.
5. Installing a socket (WR14DBDL / WR18DBDL)
Select the socket to be used.
ⅷ
Pin, O-ring type
(1) Align the hole in the socket with the hole in the anvil and insert the anvil into
the socket.
(2) Insert the pin into the socket.
(3) Attach the ring to the groove on the socket.
ⅷ
Plunger type
Align the plunger located in the square part of the anvil with the hole in the
hex. socket. Then push the plunger, and mount the hex. socket on the anvil.
Check that the plunger is fully engaged in the hole. When removing the
socket, reverse the sequence.
ⅷ
Retaining ring type
(1) Align the square portions of the socket and the anvil with each other.
(2) Make sure to firmly install the socket by pushing it all the way into the anvil.
(3) When removing the socket, pull it out of the anvil.
CAUTION:
⅜
Please use the designated attachments which are listed in the operations
manual and Hitachi’s catalog. Accidents or injuries could result from not
doing so.
⅜
Make sure to firmly install the socket in the anvil. If the socket is not firmly
installed it might come out and cause injuries.
HOW TO USE
1. Check the rotational direction
The bit rotates clockwise (viewed from the rear side) by pushing the R-side
of the push button.
The L-side of the push button is pushed to turn the bit counterclockwise.
(See Fig. 7) (The
L
and
R
marks are provided on the body.)
2. Switch operation
⅜
When the trigger switch is depressed, the tool rotates. When the trigger is
released, the tool stops.
⅜
The rotational speed of the drill can be controlled by varying the amount
that the trigger switch is pulled. Speed is low when the trigger switch is
pulled slightly and increases as the trigger switch is pulled more.
NOTE:
⅜
A buzzing noise is produced when the motor is about to rotate. This is only
a noise, not a machine failure.
3. Using the hook
The hook is used to hang up the power tool to your waist belt while working.
CAUTION:
⅜
When using the hook, hang up the power tool firmly not to drop accidentally.
If the power tool is dropped, it may lead to an accident.
⅜
When carrying the power tool with hooked to your waist belt, do not fit any
bit to the tip of power tool. If the sharp bit such as drill is fitted to the power
tool when carrying it with hooked to your waist belt, you will be injured.
⅜
Install securely the hook. Unless the hook is securely installed, it may cause
an injury while using.
(1) Removing the hook.
Remove the screws fixing the hook with Philips screw driver. (Fig. 8)
(2) Replacing the hook and tightening the screws.
Install securely the hook in the groove of power tool and tighten the
screws to fix the hook firmly. (Fig. 9)
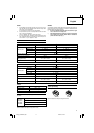
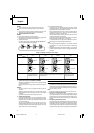
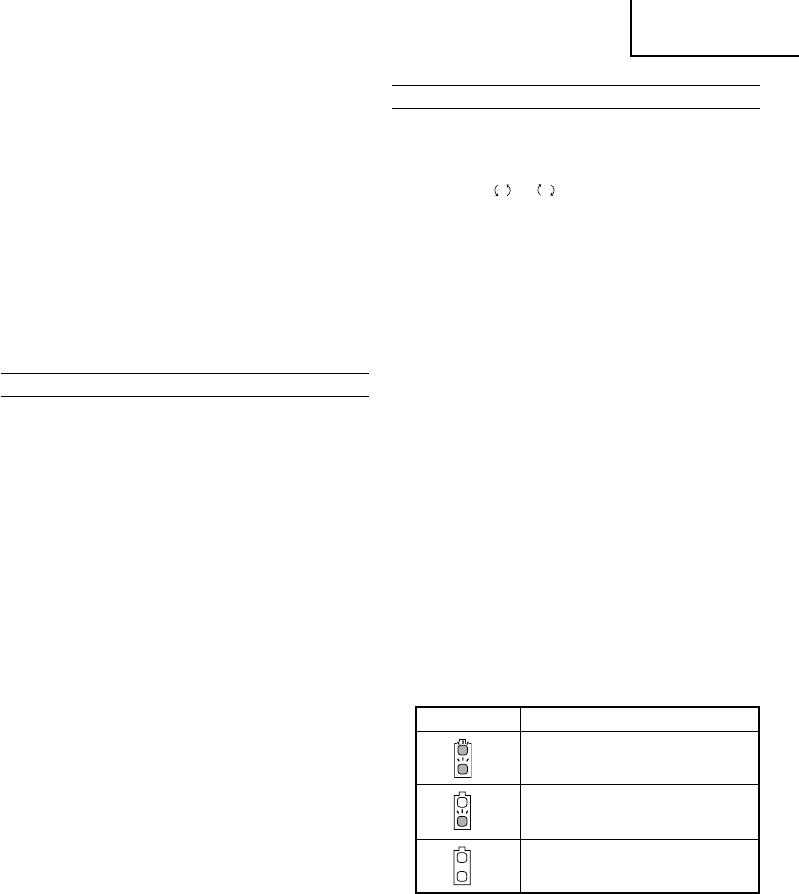
4. About Remaining Battery Indicator
When pressing the remaining battery indicator switch, the remaining battery
indicator lamp lights and the battery remaining power can be checked.
(Fig.10) When releasing your finger from the remaining battery indicator
switch, the remaining battery indicator lamp goes off. The table 4 shows the
state of remaining battery indicator lamp and the battery remaining power.
As the remaining battery indicator shows somewhat differently depending
on ambient temperature and battery characteristics, read it as a reference.
NOTE:
⅜
Do not give a strong shock to the switch panel or break it.It may lead to a
trouble.
⅜
To save the battery power consumption, the remaining battery indicator
lamp lights while pressing the remaining battery indicator switch.
5. How to use the LED light
Every time you press the light switch on the switch panel, the LED light
lights or goes off. (Fig. 11)
To prevent the battery power consumption, turn off the LED light
frequently.
State of lamp Battery Remaining Power
The battery remaining power is enough.
The battery remaining power is a half.
The battery remaining power is nearly
empty.
Re-charge the battery soonest possible.
Table 4
01Eng_WH14DBDL_EE 6/18/10, 14:2410