


English
8
ASSEMBLY AND OPERATION
REMOVAL AND INSTALLATION METHOD OF BATTERY
⅜
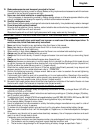
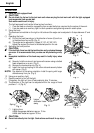
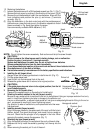
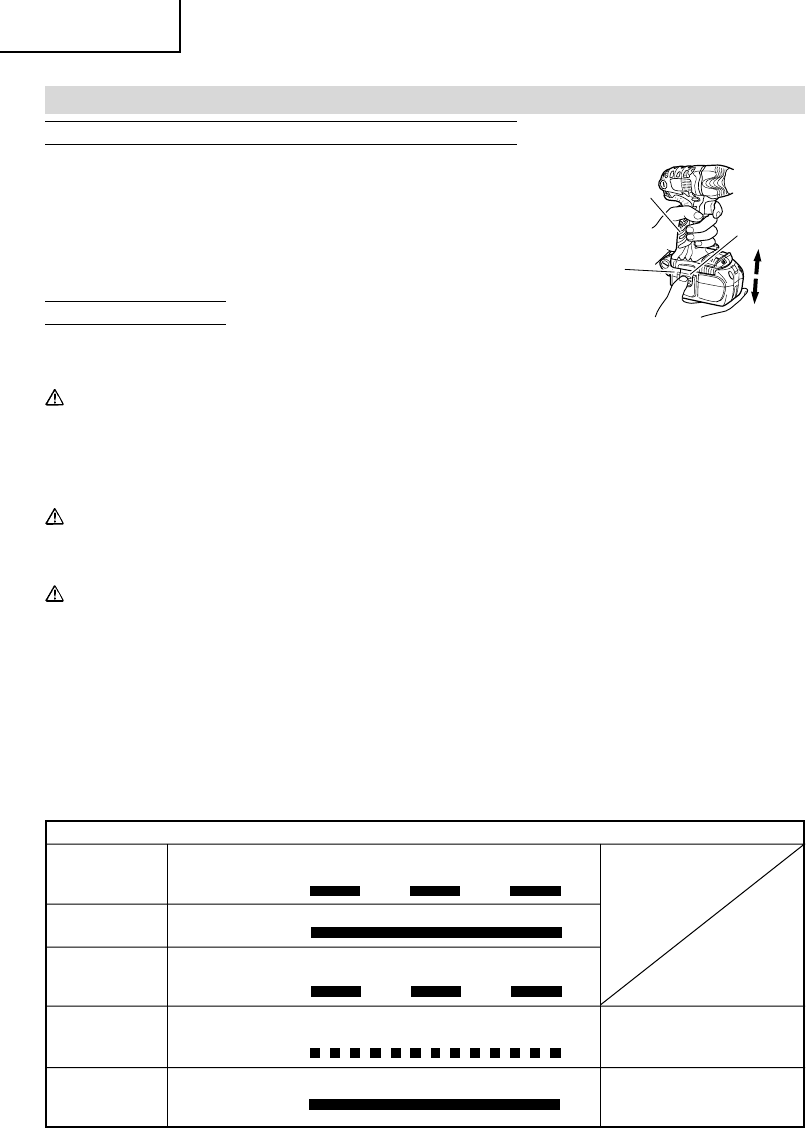
How to install the battery
Align the battery with the groove in tool handle and slip it into place.
Always insert it all the way until it locks in place with a little click. If not,
it may accidentally fall out of the tool, causing injury to you or someone
around you. (Fig. 1)
⅜
How to remove the battery
Withdraw battery from the tool handle while pressing the latch on the
side of the battery. (Fig. 1)
CHARGING METHOD
NOTE:
Before plugging into the receptacle, make sure the following points.
⅜
The power source voltage is stated on the nameplate.
⅜
The cord is not damaged.
WARNING:
Do not charge at voltage higher than indicated on the nameplate.
If charged at voltage higher than indicated on the nameplate, the charger will burn up.
〈
UC14YFA, UC24YFA, UC18YRL
〉
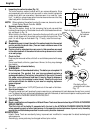
1. Insert the plug of battery charger into the receptacle
When the plug of battery charger has been inserted into the receptacle, pilot lamp will blink in red. (At 1-second intervals)
WARNING:
Do not use the electrical cord if damaged. Have it repaired immediately.
2. Insert the battery to the battery charger
Insert the battery into the battery charger. Make sure it contacts the bottom of the battery charger.
CAUTION:
●
If the batteries are inserted in the reverse direction, not only recharging will become impossible, but it may
also cause problems in the charger such as a deformed recharging terminal.
3. Charging
When the battery is connected to the battery charger, charging will commence and the pilot lamp will light in
red. (See Table 2)
NOTE:
If the pilot lamp flickers in red, pull out the plug from the receptacle and check if the battery is properly mounted.
When the battery is fully charged, the pilot lamp will blink in red slowly. (At 1-second intervals) (See Table 2)
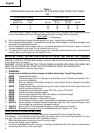
(1) Pilot lamp indication
The indications of the pilot lamp will be as shown in Table 2, according to the condition of the charger or the
rechargeable battery.
Table 2
Lights for 0.5 seconds. Does not light for
0.5 seconds. (off for 0.5 seconds)
Lights continuously
Lights for 0.5 seconds. Does not light for
0.5 seconds. (off for 0.5 seconds)
Lights for 0.1 seconds. Does not light for
0.1 seconds. (off for 0.1 seconds)
Lights continuously
Before
charging
While
charging
Charging
complete
Charging
impossible
Charging
impossible
Blinks
(RED)
Lights
(RED)
Blinks
(RED)
Flickers
(RED)
Lights
(GREEN)
Malfunction in the battery
or the charger.
The battery temperature
is high, making
recharging impossible.
Indications of the lamps
NOTE:
When standby for cooling battery, UC18YRL cools the overheated battery by cooling fan.
Battery
Latch
Handle
Insert
Pull out
Fig. 1