


3
SPECIFICATIONS
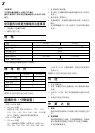
Model S18SB S15SB
Voltage (by areas)* (110V, 115V, 120V, 127V, 220V, 230V, 240V)
Power Input* 705W
No-Load Speed 4500/min.
Rubber pad outer dia. 180 mm 150 mm
Weight (only main body) 2.0 kg
PRECAUTIONS ON USING DISC SANDER
1. Keep away from a revoling sanding disc.
2. Pay strict attention to sparks.
3. Hold the disc sander firmly.
4. Do not leave the revolving disc sander unattended
on the floor.
5. Be careful those around one while operating.
6. Follow the procedures of these handling instruc-
tions on sanding disc replacement.
7. Never mount a depressed center wheel on this
tool and attempt to use it as a disc grinder.
*Be sure to check the nameplate on product as it is subject to change by areas.
STANDARD ACCESSORIES PRIOR TO OPERATION
1. Power source
Ensure that the power source to be utilized conforms
to the power requirements specified on the product
nameplate.
2. Power switch
Ensure that the power switch is in the OFF position.
If the plug is connected to a receptacle while the
power switch is in the ON position, the power tool
will start operating immediately, inviting serious
accident.
3. Extension cord
When the work area is removed from the power
source, use an extension cord of sufficient thickness
and rated capacity. The extension cord should be
kept as short as practicable.
CAUTION:
Damaged cord must be replaced or repaired.
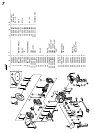
4. Attaching sanding disc
For attachment/removal of the sanding disc, refer to
“ATTACHMENT/REMOVAL OF SANDING DISC”.
Many types of sanding discs are available; select one
appropriate to the work.
5. Fixing the side handle
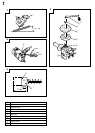
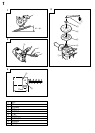
Screw the side handle into the housing.
6. Confirm the lock lever
Confirm that the lock lever is disengaged by pushing
lock lever two or three times before switching the
power tool on (See Fig. 2)
7. Install the air cover on the air vent on the side where
the side handle is attached to divert the cooling air
flow of the motor during operation as much as
possible. Hook tab of the air cover to the air vent and
push in the tab when installing. Use a screwdriver
etc. to pull as shown in Fig. 3 when removing.
PRACTICAL SANDER APPLICATIONS
1. Do not heavily push the sanding disc to the surface to
be ground. Grinding operation can be achieved with
the weight of the machine alone, so maintain the
sanding disc to an extent that it lightly touches the
surface to be ground. When the sanding disc is pushed
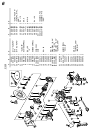
Model S18SB S15SB
180 mm Sanding disc*
1
1—
150 mm Sanding disc*
1
—1
Rubber Pad 1
Wrench 1
Side Handle 1
*
1
Grain size : P50
Standard accessories are subject to change without
notice.
OPTIONAL ACCESSORIES (sold separately)
<For Model S18SB>
⅜ 180 mm Sanding disc
There are eleven different kinds of sanding disc,
having grain sizes of P16, P20, P24, P30, P36, P40,
P50, P60, P80, P100, P120. When placing your order,
please specify the grain size of the disc desired.
<For Model S15SB>
⅜ 150 mm Sanding disc
There are eleven different kinds of sanding disc,
having grain sizes of P16, P20, P24, P30, P36, P40,
P50, P60, P80, P100, P120. When placing your order,
please specify the grain size of the disc desired.
Optional accessories are subject to change without
notice.
APPLICATIONS
⅜ Sanding metal surfaces.
⅜ Preliminary sanding of metal surfaces before painting,
rust removal, removing old paint before repainting.
⅜ Finishing woodwork, correcting projections of timbers
from joints or assemblies.
⅜ Preliminary sanding of wood surfaces before applying
paint.