


4
heavily, its revolving speed drops, creating an
unevenly finished surface and causing motor seizure
from overload.
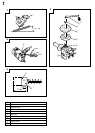
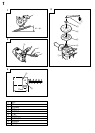
2. Rather than applying the entire disc surface to the
metal surface to be gorund, use the sander by inclining
it approximately 15° – 30° to grind with the disc
peripheral portion. (Fig. 1)
3. Switching on the sander
The switch is of the quick-break trigger system. When
the trigger is pulled, the switch turns on; and when it
is released, the switch turns off.
When it is desired to keep the power on for a
prolonged period in continuous use, the stopper can
be used to keep the switch on even after the trigger
has been released. (First pull the trigger, and then
press the stopper.) To turn the switch off, first pull
the trigger again to disengage the stopper.
4. Precaution after use
Do not lay the sander down immediately after using
on a place where there are many shavings, much dirt
and dust until it has completely stopped revolving.
CAUTION
When the disc sander is not in use, the pwer source
should be disconnected.
ATTACHMENT/REMOVAL OF SANDING DISC (Fig. 2)
CAUTION: Be sure to switch power OFF and disconnect
the attachment plug from the receptacle to
avoid serious trouble.
(1) Attach wahser, rubber pad and sanding disc on the
spindle, in that order.
(2) While pushing the lock lever with one hand, lock the
spindle by turning the rubber pad slowly with the
other hand.
Tighten the wheel washer by using the supplied
wrench.
⅜ Remove the sanding disc in the reverse order to
attachment.
CAUTION: Confirm that the lock lever is disengaged by
pushing lock lever two or three times before
switching the disc sander on.
MAINTENANCE AND INSPECTION
1. Inspecting the mounting screws
Regularly inspect all mounting screws and ensure
that they are properly tightened. Should any of the
screws be loose, retighten them immediately. Failure
to do so could result in serious hazard.
2. Maintenance of the motor
The motor unit winding is the very “heart” of the
power tool. Exercise due care to ensure the winding
does not become damaged and/or wet with oil or
water.
3. Inspecting the carbon brushes (Fig. 4)
The motor employs carbon brushes which are
consumable parts. Since an excessively worn carbon
brush could result in motor trouble, replace the carbon
brushes with new ones which have the same carbon
brush No. shown in the figure when they become
worn to or near the “wear limit”. In addition, always
keep carbon brushes clean and ensure that they slide
freely within the brush holders.
4. Replacing carbon brushes
Disassemble the brush caps with a slotted-head
screwdriver. The carbon brushes can then be easily
removed.
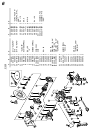
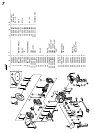
5. Service parts list
A: Item No.
B: Code No.
C: No. Used
D: Remarks
CAUTION
Repair, modification and inspection of Hitachi Power
Tools must be carried out by a Hitachi Authorized
Service Center.
This Parts List will be helpful if presented with the
tool to the Hitachi Authorized Service Center when
requesting repair or other maintenance.
In the operation and maintenance of power tools, the
safety regulations and standards prescribed in each
country must be observed.
MODIFICATION
Hitachi Power Tools are constantly being improved
and modified to incorporate the latest technological
advancements.
Accordingly, some parts (i.e. code numbers and/or
design) may be changed without prior notice.
NOTE
Due to HITACHI’s continuing program of research
and development, the specifications herein are subject
to change without prior notice.