16
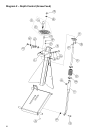
• Screw Feed Version:
Raise the blade out of the cut by pulling up on the
depth control lock and slowly turning the hand wheel
clockwise. Raise the blade (2E) high enough out of
the cut to clear the pavement when maneuvering the
saw.
• E-Z Tilt Version:
Raise the blade out of the cut by loosening the lock
handle and pulling back on the handle bar. Raise the
blade (2E) high enough out of the cut to clear the
pavement when maneuvering the saw when tightening
the lock handle.
• Turn off the Water Valve (1A).
• Turn the Engine Throttle to the IDLE position.
• STOP the engine by turning the Engine Switch (1D) to
the OFF position.
• Follow all of the instructions outlined above.
• Open the Water Valve (1A) FULL open. Check the
water to verify full flow, then adjust for proper amount
of water on the blade BEFORE you lower the Blade.
• Set the handle bar height to a comfortable position.
• Raise the Blade (2E) as high as possible so that the
Blade (2E) will not strike pavement when maneuvering.
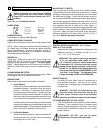
WARNINGS!!!
DO turn the “ON/OFF” switch to the “OFF” position prior
to connecting the machine to the power source.
DO make sure electric powered machines are plugged
into a properly grounded circuit.
DO make sure power cords are the proper size and in
good condition.
DO follow all electrical codes in your area.
DO use correct voltage and proper extension cords.
Never carry tool by cord or yank it to disconnect it
from receptacle. Keep cord away from heat, oil and
sharp edges.
DO disconnect tools from power source when not in use,
before servicing and when changing accessories.
DO carefully maintain and clean for better and safer
performance. Follow instructions for changing
accessories. Inspect tool cords periodically and, if
damaged, have repaired by authorized service
facility.
DO NOT lay power cords in or near the water.
DO NOT leave this machine unattended with the motor
running.
DO NOT replace the motor with any motor that does not have
a special grounding connection.
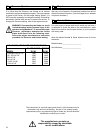
2. Electric motors of any make can burn out when the voltage
supply falls 10% below the voltage rating of the motor. Use
proper heavy duty fuses in the circuit. Use No. 8 wire for
extension cord lengths up to 100 ft. long. Under-sized
wires can cause motor burnout. Check the voltage at the
motor when the saw is cutting.
3. Single phase concrete saw motors are equipped with
manual reset overloads. When the overload trips, turn the
switch to the OFF position. Allow the motor to cool 5 to
10 minutes, then push the reset button. A click indicates
reset.
Test for adequate water supply [2-1/2 to 5 gal/
min (10 to 20 lit./min)]. Low water flow will cause
damage to diamond blades.
If water supply is interrupted, stop cutting
immediately.
Screw Feed Version:
• Lower the blade into the cut by pulling up on the Depth
Control Lock (1E) and slowly turning the Hand Wheel
COUNTER-CLOCKWISE. When the desired depth
of cut is reached, push Depth Control Lock down to
lock it in the hand wheel.
E-Z Tilt Version:
• The blade on this saw may be lowered into the
concrete by loosening the lock handle and pushing
forward on the handle bar. The weight of the saw will
assist when lowering the blade. The blade is held at
the desired depth by tightening the lock handle on the
lock bar.
• During cutting, DO NOT exert excessive side pres-
sure on the Handle Bars to attempt to “STEER” the
saw. Use only enough pressure to follow the previ-
ously marked line.
• If the saw should stall for any reason, (close the air
valve on the air models and turn the power switch off
on the electric models) raise the blade completely out
of the cut before starting your power source again!
• When lowering the Blade (2E) into a partially made
cut, the blade must be perfectly aligned within the cut
before starting to saw again. DO NOT FORCE the
Blade (2E) into the material by lowering the Blade too
fast, or by propelling the saw too fast.
7
To Maneuver the Saw
8
To Start Sawing
9 Stopping the Saw


