


English
10
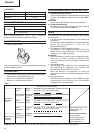
3. Change rotation speed
Operate the shift knob to change the rotational speed.
Move the shift knob in the direction of the arrow (see
Figs. 6 and 7).
When the shift knob is set to “LOW”, the drill
rotates at a low speed.!»en set to “HIGH”, the
drill rotates at a high speed.
CAUTION:
⅜ When changing the rotational speed with the shift
knob, confirm that the switch is off.
Changing the speed while the motor is rotating will
damage the gears.
⅜ When setting the shift knob to “HIGH” (high speed)
and the position of the clutch dial is “17” or “22”, it
may happen that the clutch is not engaged and that
the motor is locked. In such a case, please set the
shift knob to “LOW” (low speed).
⅜ If the motor is locked, immediately turn the power
off. If the motor is locked for a while, the motor or
battery may be burnt.
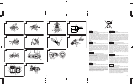
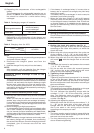
4. The scope and suggestions for uses
The usable scope for various types of work based on
the mechanical structure of this unit is shown in
Table 4.
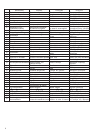
5. How to select tightening torque and rotational speed
Table 5
Work Suggestions
Wood
Drilling Steel Use for drilling purpose.
Aluminum
Machine screw Use the bit or socket matching the screw diameter.
Driving
Wood screw Use after drilling a pilot hole.
Table 4
Use
Clutch Position
Rotating speed selection (Position of the shift knob)
LOW (Low speed) HIGH (High speed)
Machine
1 – 22
For 4 mm or smaller diameter For 6 mm or smaller
Driving
screw screws. diameter screws.
Wood screw 1 –
For 6.8 mm or smaller nominal For 3.8 mm or smaller
diameter screws. nominal diameter screws.
Wood
For 27 mm or smaller For 18 mm or smaller
Drilling
diameters. diameters.
Metal
For drilling with a metal
–––––––––––––––
working drill bit.
CAUTION:
⅜ The selection examples shown in Table 5 should
be considered as general standard. As different
types of tightening screws and different materials
to be tightened are used in actual works proper
adjustments are naturally necessary.
⅜ When using the driver drill with a machine screw
at HIGH (high speed), a screw may damage or a
bit may loose due to the tightning torque is too
strong. Use the driver drill at LOW (low speed)
when using a machine screw.
NOTE:
The use of the battery EBM1430R in a cold
condition (below 0 degree Centigrade) can
sometimes result in the weakened tightening
torque and reduced amount of work. This,
however, is a temporary phenomenon, and returns
to normal when the battery warms up.
6. Using the light equipped hook
The light equipped hook can be installed on the
right or left side and the angle can be adjusted in
5 steps between 0° and 80°.
(1) Operating the hook
(a) Pull out the hook toward you in the direction of
arrow (A) and turn in the direction of arrow (B).
(Fig. 8)
(b) The angle can be adjusted in 5 steps (0°, 20°, 40°,
60°, 80°).
Adjust the angle of the hook to the desired position
for use.
(2) Switching the hook position
CAUTION:
Incomplete installation of the hook may result in
bodily injury when used.
(a) Securely hold the main unit and remove the screw
using a slotted head screwdriver or a coin. (Fig. 9)
(b) Remove the hook and spring. (Fig. 10)
(c) Install the hook and spring on the other side and
securely fasten with screw. (Fig. 11)
NOTE:
Pay attention to the spring orientation. Install the
spring with larger diameter away from you. (Fig. 11)
(3) Using as an auxiliary light
(a) Press the switch to turn off the light.
If forgotten, the light will turn off automatically
after 15 minutes.