


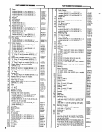

TROUBLE SHOOTING
M102
12
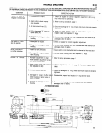
LISTED BELOW ARE SOME OF THE MOST COMMON CAUSES FOR THE SELF-FEED DRILL TO MALFUNCTION. MALFUNCTIONS BEYOND THE SCOPE
OF THIS MANUAL SHOULD BE BROUGHT TO THE ATTENTlON OF YOUR ARO REPRESENTATIVE OR RETURN THE TOOL TO FACTORY FOR REPAIR.
CONDITION
Failure to feed or
irregular or erratic feed.
Low speed or motor
fails to operate.
Motor continues to
run after retraction.
Failure to retract.
POSSIBLE CAUSE
1. Inadequate air supply
2. Feed control valves improp-
erly adjusted.
3. Air leak around cap (12).
4. Dirt or damaged “O” rings on
spool valve (14).
5. Clogged air passage in valve
housing.
1. Inadequate air supply.
2. Clogged air passage in valve
housing.
1. Piston not fully retracted.
2. Damaged “O” ring (11) inside
valve housing.
1. Improper adjustment or align-
ment between adjustment screw
and button bleed valve.
2. Feed control valves (23) improp
erly adjusted or dirty
3. Air leak around cap (12).
4. Damaged “O” rings in muffler cap,
valve housing or spool valve or
seals on piston.
5. Clogged air passage in valve
housing.
CORRECTIVE ACTION
1 Check air supply for correct regulator adjustment (90 p.s.i.g.
max. when tool is operating).
2. Refer to set-up procedure, page 1
3. Check for damage to “O” ring. Check and insure caps are properly
tightened.
4. Refer to valve section, page 4, and remove spool valve
Inspect, clean and replace “O” rings
5. Remove valve housing from tool. Disassemble and blow all air
passages clear of debris.
1. Check air supply for correct regulator adjustment
2. Remove valve housing from tool. Disassemble and blow all air
passages clear of debris.
1. Insure piston is not obstructed and is returned all the way back
2. Remove valve housing from tool. Replace “O” rings.
Refer to set-up procedure, page 1.
2. Check adjustment, refer to page 2. Remove, inspect and
clean.
3. Check for damage to “O” ring. Check and insure caps are properly
tightened.
4. Disassemble, inspect and replace “O” rings and/or seals.
5. Remove valve housing from tool. Disassemble and blow air
passages clear of debris.
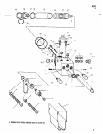
ACCESSORIES