


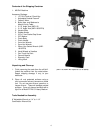


7
Assembly
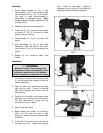
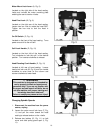
1. Screw rubber handles (A, Fig. 1) onto
handle shaft (B, Fig. 1). Screw handle shaft
into downfeed hub (C, Fig. 1) and tighten.
Flat spot on shaft accommodates a
combination or adjustable wrench. Note:
Handle shafts are already installed into hub
on JMD-18PFN.
2. Repeat for other two shaft assemblies.
3. Slide crank (D, Fig. 2) onto shaft and tighten
setscrew(E,Fig.2).Besuresetscrew
seats on flat part of shaft.
4. Thread handle (F, Fig. 2) into crank and
tighten.
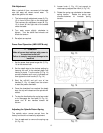
5. Slide handwheel (G, Fig. 3) onto table
handwheel shaft and tighten set screw.
Insert handle (H, Fig. 3) into handwheel and
tighten.
6. Repeat for two remaining table hand
wheels.
Installation
WARNING
Machine is heavy! Use an appropriate
lifting device and use extreme caution when
moving the machine to its final location.
Failure to comply may cause serious injury!
1. The location for the mill/drill should be well
lit, dry, and have room enough to allow the
head to rotate 360°.
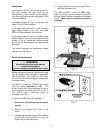
2. Open the belt cover and thread the lifting
hook into the head. There is a threaded
hole found between the column and the
spindle pulley.
3. Carefully lift the mill/drill with properly rated
equipment to a sturdy stand or work bench.
For best performance, through bolt the
mill/drill to a bench or stand.
4. Remove the lifting hook.
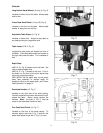
5. Before bolting the mill/drill to a bench or
stand, the unit must be level in both
directions. Place a level on the table in both
directions.
6. If the table is not level, shim under the low
corner(s) until level. Tighten the fastening
bolts. Check for level again. Adjust as
necessary until the mill/drill is level after the
fastening hardware has been tightened.