


8
Unpacking, Mounting and Assembly
1. With the help of an assistant, carefully
uncrate the planishing hammer. A tab is
welded to the top tube if you choose to use
a hoist to set up the machine.
2. Determine the most suitable location for
your planishing hammer based on the
planned usage of the machine. Larger
workpieces require a larger space around
the planishing hammer.
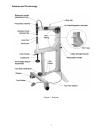
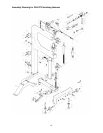
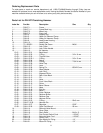
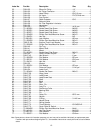
3. Mount any loose items to the frame, such as
the die trays, using the photo on page 7 and
the breakdown on page 10 as guides.
4. Lower the foot pads to contact the floor, using
the handwheel.
5. Secure the planishing hammer to the floor
using fasteners (not included) appropriate for
the floor type. These are inserted through the
holes on the frame’s back leg.
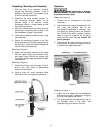
Referring to Figure 2:
6. Attach the pneumatic hammer to the frame
with the upper clamp (has rounded notch)
and lower clamp. Secure the clamps with
four M6x25 socket head cap screws and M6
lock washers.
Referring to Figure 3:
7. Check the oil level in the lubricator. If the oil
level is low, refill. Refer to Maintenance
section for instructions.
8. Install a male 1/4" quick connector fitting
onto the air inlet of the planishing hammer.
Figure 2
Operation
Keep hands clear of hammer
and anvil area at all times! Failure to comply
may cause serious injury!
Referring to Figure 3:
1. Connect the air compressor to the quick
connector.
2. Set the desired air pressure between 90-120
PSI using the pressure dial on the
filter/regulator (clockwise to increase). Lock
the setting by pushing down the pressure
dial. Pull up on the dial to readjust a setting.
Note: A lower air pressure will provide a
softer hammer blow. Do not exceed 120
psi air pressure.
3. Adjust the oil flow using the dial at the top of
the lubricator. A setting of 2 drips per minute
is sufficient for regular operation.
Figure 3
Referring to Figure 4:
4. Adjust the anvil height with the handwheel,
and secure the anvil in position by snugging
the lock collar against the frame.
5. The lock handle can be inserted into any of
the threaded holes in the collar, and
tightened using a wrench on the flats.