


In certain situations, the bit may bind and the drill will kick-
back in the opposite direction. This sudden reaction could lead to loss of con-
trol and possible serious injury. Always be prepared for the possibility of kick-
back, especially when breaking through material to complete a hole.
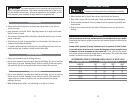
DRILLING WOOD
• Always clamp the work piece to a steady base. Never hold in your hand or
across your legs.
• Apply pressure in line with the bit. Applying pressure at an angle could cause
the bit to bind or break.
• Thin materials that may splinter should be drilled with another piece of wood
placed underneath.
• Twist bits can be used for wood drilling but will overheat if the flutes are not
cleared of wood chips periodically.
• To prevent splintering when finishing holes, stop drilling just before the hole
breaks through and complete the hole from the other side.
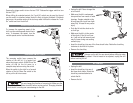
DRILLING MASONRY
• Always use carbide tip bits for drilling masonry.
• Use an even pressure, hard enough to keep the drill biting, but not so hard that
the bit spins in the hole. Spinning the bit will dull it quickly. Bricks and similar
soft materials will take less pressure than a hard material like concrete.
DRILLING METAL
• Use an even pressure, hard enough to keep the drill biting, but not so hard that
the bit spins in the hole. Spinning the bit will dull it quickly. Soft metals like
copper, cast iron, brass or aluminum will take less pressure than harder
materials like steel.
• When drilling harder metals, use lubricating oil on the tip of the bit.
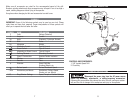
MAINTENANCE AND CLEANING
Unplug the drill before performing maintenance or cleaning.
• Never immerse tool in liquid. Never let any liquid inside tool housing.
• Clean with a damp cloth and mild soap. Do not use solvents or harsh detergents.
• Check brushes periodically. Worn brushes should be replaced by qualified serv-
ice personnel.
• Keep air vents clean and free from debris. Blocked air vents can lead to over-
heating.
ACCESSORIES
Use only accessories that are recommended by the manufacturer for your model.
Accessories that may be suitable for one tool may become hazardous when used on
another tool.
Always attach grounded (3-prong) extension cords to grounded (3-hole) outlets.
If you must use an extension cord, be sure that the gauge is large enough to carry
the amount of current necessary for your power tool. If not, your tool may experi-
ence a loss of power, excessive voltage drop or overheating. The smaller the gauge
number, the heavier the cord (see table below).
RECOMMENDED SIZES OF EXTENSION CORDS 120 VOLT AC 60 HZ TOOLS
TOOL CURRENT RATING CONDUCTOR SIZE IN A.W.G
AMPERE 10FT. 25FT. 50FT. 100FT.
3-6 18 18 18 18
6-8 18 18 18 16
8-10 18 18 18 14
10-12 16 16 14 14
12-16 14 12 12 -
16-20 12 12 12 -
1211