


INSTALLATION INSTRUCTIONS
Do not begin assembly of bench grinder if the AC power
cord is plugged into an AC power receptacle.
Do not begin assembly of bench grinder if power switch on the front of the
base is switched to the “ON” position.
INSPECTION: Carefully inspect each individual part of the bench grinder to ensure
there are no cracked, broken, or bent components needed for a safe installation.
1. Carefully choose a location for the bench grinder. If mounted on a workbench,
ensure there is adequate room all around the grinder for safe operation. The
area must be level and clear of other power tools and/or power tool cords that
could interfere with operation of the bench grinder.
2. If the bench grinder is installed on a universal tool stand (available at larger
hardware stores), ensure there is plenty of unobstructed space around the
grinder as not to interfere with safe operation on the tool.
3. The bench grinder should be installed in a place that is away from outside ele-
ments and close to an approved power receptacle so that an extension cord will
not be needed. Should an extension cord be needed, refer to Page 18 in this
manual for choosing the proper length and wire gauge needed for safe opera-
tion of the bench grinder.
4. Do not assemble and/or use the grinder in an area that may be contaminated
with oily rags. Keep flammable materials such as gasoline, paint thinner or sol-
vents. Sparks from normal grinding operations can ignite these compounds
resulting in moderate to severe burns to the operator.
5. Carefully inspect the grinding wheels to ensure they were not damaged during
shipment. Fractured grinding wheels can shatter during grinding operations and
throw off pieces at high speeds. Failure to adhere to these cautions can cause
severe injury including blindness or even death to the operator.
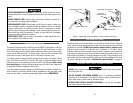
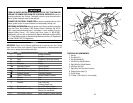
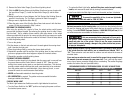
INSTALLING THE TOOL RESTS
When installing the Tool Rests on the bench grinder, NOTE there is a Left Tool Rest
and a Right Tool Rest. The tool rest shelf ALWAYS points away from the motor and
the two different tool rests cannot be installed on the wrong side. See Figure 2.
1. Remove the two mounting bolts (1) and washers (2) from the inside of the
Grinding Stone Guard (4).
2. Insert the mounting bolts and washers through the slotted hole at the bottom
of the Tool Rest (3) and reattach them to the Grinding Stone Guard.
3. Position the Tool Rest no more than 1/8" away from the Grinding Stone (5).
4. Tighten the two mounting bolts securely, using the appropriate size metric
combination wrench, to prevent the Tool Rest from moving during usage of the
bench grinder.
5. As the grinding stones wear down, loosen the two mounting bolts and adjust
the tool rest inward maintaining the 1/8" gap.
6. Re-tighten the two mounting bolts securely, using the appropriate size metric
combination wrench, to prevent the Tool Rest from moving during usage of the
bench grinder.
Ensure the Tool Rest is securely tightened before turning
the bench grinder power switch to “ON!” Always replace a Tool Rest should it
become broken. Contact Alltrade Customer Service at 1-800-590-3723 (toll
free) for authorized replacement parts.
1211
FIGURE 2. INSTALLING THE R/H TOOL REST
1
2
3
4
5