


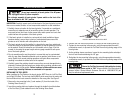

4. Remove the rear bolt attaching the Tool Rest to the Grinding Wheel Guard.
5. Loosen the front bolt on the Tool Rest. Move the Tool Rest forward as far from
the Grinding Shield Guard as possible and re-tighten.
6. Wedge a small piece of wood between the Grinding Wheel Guard and the
Grinding Stone to prevent it from turning.
7. Using a wrench, loosen and remove the Arbor Nut (4) from the Motor
Spindle (8).
The Motor Spindle has left-hand threads on the left side
and right-hand threads on the right side. Left-hand threads LOOSEN by turn-
ing them clockwise where as right hand threads loosen by turning them
counter-clockwise. This prevents the spindle nuts from becoming loose dur-
ing grinder operations.
DO NOT attempt to “grind” work pieces made of WOOD
or MAGNESIUM. Using wood with a bench grinder could easily start a fire or
cause severe irreversible damage to the work piece. Grinding work pieces
made of magnesium or magnesium alloys can ignite causing sudden very
intense fires. Magnesium fires cannot be easily extinguished. ABSOLUTELY
DO NOT THROW WATER ON A MAGNESIUM FIRE. USE ONLY A FIRE EXTIN-
GUISHER RATED FOR SUCH FIRES OR CALL FOR ASSISTANCE (9-1-1). When
water is introduced to a magnesium fire, the sudden temperature change
could cause the metal to explode sending very hot pieces throughout the
work area possibly igniting other fires.
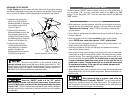
• Use optional accessories such as wire wheels and buffing wheels to create
finishing touches to your work piece.
• WIRE WHEELS should never be used on work pieces that are polished or have
a textured surface. The wheel will deface these surfaces. Like grinding stones,
work pieces can be held too long against the wire wheels resulting in high
temperatures and possible damage to the work piece.
Consult with Alltrade Customer Service at 1-800-590-3723 (toll free) for assistance
in choosing the proper grinding wheels and accessories for your grinder.
MAINTENANCE AND CLEANING
During normal use, the abrasive grinding wheels may become cracked, grooved,
develop rounded corners on the edges, chipped, loaded with foreign material or
worn from the original shape and will need to be replaced. Grinding wheels that are
chipped or cracked should be replaced IMMEDIATELY.
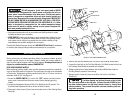
REPLACING GRINDING WHEELS
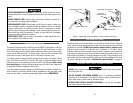
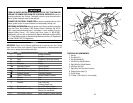
When replacing grinding wheels, make sure the replacement wheel has a speed rat-
ing at or above the speed of the grinder. The speed rating is listed on the nameplate
of the grinder. Replacement grinding wheels should have a 1/2" arbor hole and a
maximum width of 3/4". See Figure 4.
1. Ensure the POWER SWITCH (1) is set to the “OFF” position and the electrical
power cord is removed from the power source before changing grinding
wheels.
2. Loosen the Adjustment Knob and lift the Eye Shields to the UP position. The
Eye Shield and Adjustment Knob are shown in Detail A, above.
3. Remove the three screws (2) and remove the outer cover of the Grinding Stone
Guard (9).
15 16
FIGURE 4. REPLACING GRINDING WHEEL
GRINDING WHEEL
WOODEN WEDGE
TOOL REST
GRINDING WHEEL
GUARD
2
2
8
9
10
1
4
5
6
7