


1817
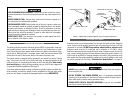
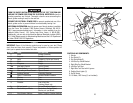
8. Remove the Outer Arbor Flange (5) and the old grinding wheel.
9. Slide the NEW Grinding Stone onto the Motor Spindle and ensure it seats with
the Inner Arbor Flange (7). Install the Outer Arbor Flange (5) and the Arbor
Nut (4).
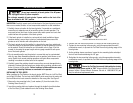
10.Wedge a small piece of wood between the Tool Rest and the Grinding Stone to
prevent it from turning. The Tool Rest is pictured in Detail A on page14.
11.Using a wrench, tighten the Arbor Nut (4).
12.Place the outer cover of the Grinding Stone Guard and secure it with the three
screws (2) that were removed in Step 3, above.
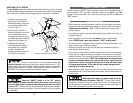
DRESSING THE GRINDING WHEELS
After using the grinding for a period of time, the wheel surface could become
grooved and the edges rounded. Re-surfacing the grinding wheel is called “dress-
ing the wheel.” Use a suitable silicone carbide, stick-type dresser or the wheel
dresser provided with the grinder. An uneven grinding wheel can cause poor results
upon grinding items that use the entire surface of the wheel. Follow the steps below
to dress the grinding wheel.
1. Turn on the grinder.
2. Set the dresser on the tool rest and move it forward against the moving wheel
until it touches the high point.
3. Dress the grinding wheel by moving the dresser back and forth.
4. Repeat this operation until the surface of the grinding wheel is clean and free of
grooves or gouges and the wheel edges are square to the wheel surface.
5. Repeat this operation on both grinding stones.
CLEANING THE BENCH GRINDER
• The bench grinder should only be cleaned after the power cord is removed from
the power source and the Power Switch is turned to “OFF.” Clean any dust
buildup from around moving parts or near electrical connections. This dust can
possibly contain metallic shavings that could cause electricity to be conducted
from the grinder parts to a grounded object. Use a clean rag, brush, or com-
pressed air source to remove excessive dust buildup.
• NEVER use flammable materials to clean the grinder.
• NO LUBRICATION is required. The grinder motor uses sealed lubrication
bearings installed at the factory.
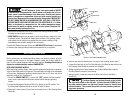
FLEXIBLE WORK LIGHT
The Work Light features two flexible arms with a light attached to each arm.
• Turn the Power Switch to the “OFF” position and unplug the power cord from
the electrical power source.
• To replace the Work Light bulbs, wait until they have cooled enough to safely
handle, and unscrew the used bulb by turning it counterclockwise.
• Install a new bulb in the Work Light, insert it into the socket, and turn it clockwise.
To prevent the possibility of fire, do not use light bulbs
brighter than 15 watt and rated for 120V AC, 60Hz.
ACCESSORIES
Optional accessories for the bench grinder can include wire-brush wheels that can
be used for cleaning and layered cloth wheels that can be used for polishing and
buffing. Contact ALLTRADE Customer Service at 1-800-590-3723 (toll free) to find
out what accessories are available for the bench grinder.
Only use accessories that are designed to fit your partic-
ular grinder. These accessories should be specifically labeled to match the
speed and arbor size of the grinder. Failure to use the proper accessories
could result in property damage, damage to the grinder, and serious person-
al injury to the operator.
Always attach grounded (3-prong) extension cords to grounded (3-hole) outlets.
If the grinder must be used outside, use an extension cord labeled “W-A” or
“W.” These extension cords are rated for outdoor use and reduce the chances of
electrical shock.
If you must use an extension cord, be sure that the gauge is large enough to carry
the amount of current necessary for your power tool. If not, your tool may experi-
ence a loss of power, excessive voltage drop or overheating. The smaller the gauge
number, the heavier the cord (see table below).
RECOMMENDED SIZES OF EXTENSION CORDS 120 VOLT AC 60 HZ TOOLS
TOOL CURRENT RATING CONDUCTOR SIZE IN A.W.G
AMPERE 10FT. 25FT. 50FT. 100FT.
3-6 18 18 18 18
6-8 18 18 18 16
8-10 18 18 18 14
10-12 16 16 14 14
12-16 14 12 12 -
16-20 12 12 12 -