


This Cordless Impact Wrench is lubricated before it
leaves the factory. This lubrication should last for the life of the tool. No
further lubrication is required.
Use only mild soap and a damp cloth to clean the tool. Never let any liquid get
inside the casing. Never immerse any part of the tool in a liquid. Always keep the
ventilation openings clear.
Always clean the battery pack using only a dry cloth. Do not use liquids.
Always unplug the charger before cleaning it.
Regularly clean the ventilation slots in your tool and charger using only a soft
brush or dry cloth.
Never open the Cordless Impact Wrench case, battery pack or charger. Do not
attempt to repair the Cordless Impact Wrench, battery pack or charger yourself.
Opening any of these parts will void your warranty.
ACCESSORIES
Use only accessories that are recommended by the manufacturer for your model.
Accessories that may be suitable for one tool may become hazardous when used on
another tool.
Always attach grounded (3-prong) extension cords to grounded (3-hole) outlets.
If you must use an extension cord, be sure that the gauge is large enough to carry
the amount of current necessary for your power tool. If not, your tool may
experience a loss of power, excessive voltage drop or overheating. The smaller the
gauge number, the heavier the cord (see table below).
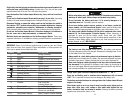
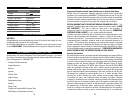
RECOMMENDED SIZES OF EXTENSION CORDS 120 VOLT AC 60 HZ TOOLS
TOOL CURRENT RATING CONDUCTOR SIZE IN A.W.G
AMPERE 10FT. 25FT. 50FT. 100FT.
3-6 18 18 18 18
6-8 18 18 18 16
8-10 18 18 18 14
10-12 16 16 14 14
12-16 14 12 12 -
16-20 12 12 12 -
14
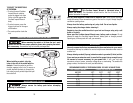
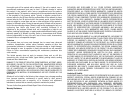
TO SELECT THE DIRECTIONS
OF ROTATION:
• To select forward Cordless
Impact Wrench rotation,
press the trigger lock from
left to right flat against the
Cordless Impact Wrench
body.
• To select reverse, press the
trigger lock lever in the oppo-
site direction.
• The center position locks the
tool.
INSTALLING / REMOVING SOCKET ON THE ANVIL
When removing the socket or bit from the tool, avoid
contact with skin and use proper protective gloves when grasping the socket,
bit or accessory. Accessories may be hot after prolonged use.
When installing a socket, align the
holes in the side of the socket with the
dent pin. Press the socket on until the
dent pin engages in the hole. To remove a
socket, depress the dent pin through the
hole using a small pointed object and pull
the socket off.
MAINTENANCE AND CLEANING
Always remove the battery pack before attempting
cleaning or maintenance.
13
Reverse Lock Forward
TRIGGER
LOCK