


13
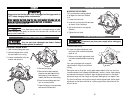
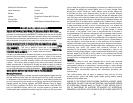
A method of checking the correct cut-
ting depth is to lay a piece of the
material you plan to cut along the side
of the blade and observe how much
tooth projects beyond the material.
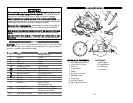
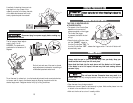
BEVEL ANGLE ADJUSTMENT
Disconnect plug from power supply before making any
adjustments to the tool.
The full range of bevel adjust-
ment is from 0 to 45
DEGREES. The quadrant is
graduated in increments of 5
degrees.
On the front and rear of the saw is a bevel
angle adjustment mechanism consisting of
a calibrated quadrant and a knob.
To set the saw for a bevel cut, turn the bevel adjustment knobs counterclockwise
to loosen, and tilt shoe to the desired angle by aligning the pointer with the
desired angle mark. Retighten knobs firmly by turning clockwise.
OOPPEERRAATTIINNGG TTHHEE CCIIRRCCUULLAARR SSAAWW
AAllwwaayyss uunnpplluugg tthhee ttooooll bbeeffoorree aatttteemmppttiinngg ttoo cchhaannggee tthhee
bbllaaddee oorr aacccceessssoorriie
ess..
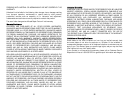
OOPPEERRAATTIINNGG TTHHEE OONN//OOFFFF SSWWIITTCCHH
THIS TOOL IS CONTROLLED BY
A TRIGGER SWITCH:
• The speed of the Circular Saw
depends on the amount of
pressure applied on the trigger.
The further the trigger
is pressed, the faster the tool
will go.
• Press the lock-off button, then
pull the “ON/OFF” trigger to
turn the Circular Saw “ON”. To
turn the Circular Saw “OFF”, release the trigger switch. The lock-off button will
automatically reset.
GGEENNEERRAALL CCUUTTTTIINNGG
Always hold the saw in front of you and away from your body. Keep your
hands and feet well away from the work piece.
Never feed the blade into the work piece until the blade is at full speed.
If the blade is not at full speed, the saw may kick back causing serious
personal injury.
Do not force the saw. Excessive force may result in a
broken blade. Use only enough pressure to keep the saw moving through the
work piece.
• Put on eye protection.
• Clear the saw of any foreign material.
• Make sure the work piece is held securely in place. Hold smaller pieces in a vise
or attach to the workbench with clamps.
• Mark out the line to be cut so it is easily visible.
30º
14