


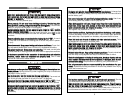

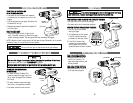

TTOORRQQUUEE SSEETTTTIINNGGSS
TToo pprreevveenntt ddaammaaggiinngg tthhee ttooooll oorr ddrriivviinngg ssccrreeww ttoooo ddeeeepp
iinnttoo wwoorrkk ppiieeccee,, rreelleeaassee tthhee
ttrriiggggeerr wwhheenn yyoouu ffeeeell tthhee cclluuttcchh sslliipp..
TTHHEE CCOONNTTRROOLL RRIINNGG AADDJJUUSSTTSS TTHHEE LLEEVVEELL OOFF TTOORRQQUUEE::
• For light duty work, use lower settings.
• For heavy duty work, use higher settings.
PPRROOPPEERR SSEETTTTIIN
NGG FFOORR DDRRIIVVIINNGG SSCCRREEWWSS::
1. Set the ring on the lowest
setting to begin.
2. Try tightening the first screw.
If the drill drives smoothly,
proceed with the next screw.
3. If the Drill’s clutch slips,
increase the torque setting
and try again until the Drill
drives the screw without incident.
HHIIGGHH//LLOOWW SSPPEEEEDD ((GGEEAARR)) SSHHIIFFTTIINNGG
FFOORR LLOOWW SSPPEEEEDD SSEETTTTIINNGG::
• Slide the switch on top of
the Drill to Position 1 for
high torque applications and
driving screws.
FFOORR HHIIGGHH SSPPEEEEDD SSEETTTTIINNGG::
• Slide the switch to Position
2 for light duty projects.
16
VVAARRIIAABBLLEE SSPPEEEEDD TTRRIIGGGGEERR SSWWIITTCCHH
TTHHIISS TTOOOOLL IISS CCOONNTTRROOLLLLEEDD
BBYY AA TTRRIIGGGGEERR SSWWIITTCCHH::
• The speed of the Cordless Drill depends
on the amount of pressure you put on the
trigger.
• The more pressure you apply, the faster the
Cordless Drill will go.
• Release the pressure and the Cordless Drill
will slow down.
BBUUIILLTT IINN LLEEDD LLAAMMPP
• Press the trigger switch to light up the
lamp. The lamp remains on while the trigger
switch is being pressed. The lamp goes out after releasing the trigger.
NOTE: Use a dry cloth to wipe the dirt off the lens of lamp. Be careful not to scratch
the lens of lamp, or it may lower the illumination.
Do not look into light or see the source of light directly.
FFOORRWWAARRDD// RREEVVEERRSSEE AANNDD TTRRIIGGGGEERR LLOOCCKK LLEEVVEERR
BBee ssuurree tthhee ttrriiggggeerr iiss rreelleeaasseedd wwhheenn cchhaannggiinngg tthhee ppoossiittiioonn oof
f tthhee lleevveerr..
Always store the tool in the
““LLOOCCKKEEDD//OOFFFF””
position.
AAllwwaayyss cchheecckk tthhee ddiirreeccttiioonn ooff tthhee CCoorrddlleessss DDrriillll''ss rroottaattiioonn bbeeffoorree uussee..
TT
OO SSEELLEECCTT TTHHEE DDIIRREECCTTIIOONNSS
OOFF RROOTTAATTIIOONN::
• To select forward Cordless Drill
rotation, press the trigger lock from
left to right flat against the Cordless
Drill body.
• To select reverse, press the trigger
lock lever in the opposite direction.
• The center position locks the tool.
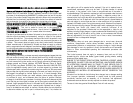
CONTROL RING
HIGH SPEEDLOW SPEED
TRIGGER
LOCK
TRIGGER
SWITCH
LED LIGHT
FORWARD
LOCK
REVERSE
15