


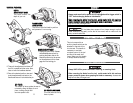
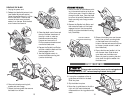


CCOONNTTRROOLL FFEEAATTUURREESS::
AASSSSEEMMBBLLYY
Always make sure that the power cord is unplugged and the trigger switch is
“OFF” before changing blades or attachments.
WWhheenn rreemmoovviinngg tthhee bbllaaddee ffrroomm tthhee ttooooll,, aavvooiidd ccoonnttaacctt wwiitthh sskkiinn aanndd uussee
pprrooppeerr pprrootteeccttiivvee g
glloovveess wwhheenn ggrraassppiinngg tthhee bbllaaddee oorr aacccceessssoorryy..
Accessories
may be hot after prolonged use.
If the blade clamp screw will not loosen enough to allow
blade installation, tap gently on the end of the wrench with a mallet until the
clamp screw breaks free.
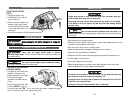
AATTTTAACCHHIINNGG AAUUXXIILLIIAARRYY HHAANNDDLLEE
This tool comes with an
auxiliary handle which can be
attached to the side of the
circular saw. This handle is
necessary to maintain
complete control of the tool
and should be used at all
times. Make sure this handle
is always fastened securely.
ATTACHING / REMOVING BLADE
Always UNPLUG the power cord before installing or removing blade.
When removing the blade from the tool, avoid contact with skin and use
proper protective gloves when grasping the blade or accessory. Accessories
may be hot after prolonged use.
RRIIPP FFEENNCCEE
The scaled rip fence guides the saw to
cut exactly along the edge of work
piece, making straight and
accurate parallel cuts.
DDEEPPTTHH
AADDJJUUSSTTMMEENNTT KKNNOOBB
This knob controls the
depth of your cut.
RRIIPP FFEENNCCEE LLOOCCKK KKNNOOBB
This knob secures the rip
fence in place.
HHAANNDDLLEE AADDJJUUSSTTMMEENNTT
1. Unplug the power cord. Release
the handle adjustment lock by
pushing the plastic slide in the
direction as shown by the arrows
on the adjustment lock to disen-
gage from the locking pin.
11 12
BBLLAADDEE SSAAFFEETTYY
LLOOCCKK BBUUTTTTOONN
This button locks the blade in position
and prevents it from moving.
2. Then pull the adjustment lock down so
that it is in parallel with the motor. Now,
raise or lower the handle as desired.
3. Once in the desired position, raise and
push the adjustment lock back to the
handle and ensure it locks inside the pin.