


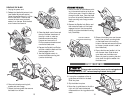


AATTTTAACCHHIINNGG TTHHEE BBLLAADDEE::
1.Ensure the teeth of the blade are point-
ing in the same direction as the arrow
on the lower guard. Insert the blade up
through the saw shoe. Place the blade
bore over the spindle. Reassemble the
blade mounting outer flange, washer
and bolt.
2.Depress the Spindle Lock Button and
then rotate the blade until the blade
engages the lock. Use the supplied
wrench to tighten the blade mounting
bolt (Clockwise).
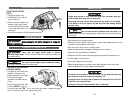
AATTTTAACCHHIINNGG TTHHEE RRIIPP GGUUIIDDEE
Always make sure that the power cord is unplugged and
the trigger switch is “OFF” before attempting to attach the rip guide.
1. Loosen rip guide pins.
2. Line up the crosspieces of the rip
guide fence with slots in the base.
Slide into place.
3. Slip the blade into place.
4. Move the rip guide fence to the left or
right until you reach the desired
measurement on the rip guide’s width
scale.
REMOVING THE BLADE:
1. Unplug the power cord.
2.Release the Handle Adjustment Lock
(see Handle Adjustment section).
Lower the saw handle so it is in-line
with the saw shoe. Unscrew and
remove the dust cover knob and
washer from the saw. Slide the dust
cover forward and remove.
3.Raise the depth control lever and
then pull the saw shoe down all
the way in order to raise the
blade above saw shoe level.
Unscrew and remove the 3
Phillips screws and washers and
remove the blade cover.
4.Depress the Spindle Lock Button
and then rotate the blade until the
blade engages the lock.
5. Use the supplied wrench to
loosen the blade mounting bolt
(counter-clockwise).
3.Reinsert the blade cover over the saw
blade. Line up the 3 mounting holes
on the blade cover with mounting
holes on the saw and secure the cover
to the saw (smaller screw is used in
the middle hole).
4.Ensure that the saw handle is in-line
with the saw shoe. Slide the dust
cover back over the blade cover.
Secure in place by screwing the dust
cover knob through the washer into
the blade cover.
14
6. Remove the blade mounting bolt,
washer and outer flange.
7. Retract the lower guard then remove
the blade from the saw.
13
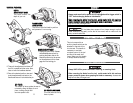
Outer Shroud MUST
slide beneath handle flange.