


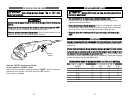

AATTTTAACCHHIINNGG AAUUXXIILLIIAARRYY HHAANNDDLLEE
This tool comes with an auxiliary handle
which can be attached to different sides
of the Angle Grinder, depending on the
preference of the operator. This handle
is necessary to maintain complete con-
trol of the tool and should be used at all
times. Make sure this handle is always
fastened securely.
AATTTTAACCHHIINNGG WWHHEEEELL GGUUAARRDD
NNeevveerr bbrruusshh oorr ggrriinndd wwiitthhoouutt tthhee gguuaarrdd iinn ppllaaccee..
Brushes
are considered to be grinding wheels and must also be used with guards.
• Always unplug the tool before attempt-
ing to change the guard or accessories.
• Set the Angle Grinder on a flat surface
with the spindle facing up.
• Place the spring washer of the guard
over the spindle.
• Tighten the screw of the spring washer.
• Make sure that the guard is securely
tightened in place.
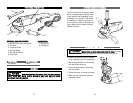
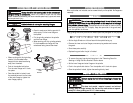
FFUUNNCCTTIIOONNAALL DDEESSCCRRIIPPTTIIOONN
CCOONNTTRROOLLSS AANNDD CCOOMMPPOONNEENNTTSS::
1. ON/OFF Switch with Locking Tab
2. Tool Body
3. Protective Guard
4. Grinding Wheel
5. Spindle Lock Button
6. Power Cord
CCOOMMPPOONNEENNTT MMOODDEELL NNUUMMBBEERR
Pin Spanner 690157
AASSSSEEMMBBLLYY
MMaakkee ssuurree yyoouu hhaavvee ffuullll ccoonnttrrooll ooff tthhee ttooooll wwhheenn ggrriinnddiinngg
iinnttoo aa ccoorrnneerr aass aa sshhaarrpp,, ssuuddddeenn m
moovveemmeenntt mmaayy ooccccuurr wwhheenn tthhee wwhheeeell
ccoonnttaaccttss aa sseeccoonnddaarryy ssuurrffaaccee..
9 10
AACCCCEESSSSOORRIIEESS::
7. Side Handle
8. Pin Spanner
8
5
4
3
6
7
1
2