


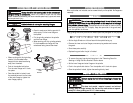

MMAAIINNTTEENNAANNCCEE AANNDD CCLLEEAANNIINNGG
AAllwwaayyss UUNNPPLLUUGG tthhee ttooooll ffrroomm tthhee ppoowweerr ssoouurrccee bbeeffoorree
cclleeaanniinngg oorr mmaaiinntteennaanncce
e..
•
UUssee ccoommpprreesssseedd aaiirr ttoo bbllooww oouutt aannyy aaccccuummuullaatteedd dduusstt oorr ggrriitt..
Tiny
particles from metal grinding often accumulate inside your tool and could
create an electrical shock hazard.
•
NNeevveerr uussee ssoollvveennttss oorr hhaarrsshh cchheemmi
iccaallss..
Use only mild soap and a damp cloth
to clean the tool. Never let any liquid get inside the casing. Never immerse any
part of the tool in a liquid. Always keep the ventilation openings clear.
•
RReegguullaarrllyy cclleeaann tthhee vveennttiillaattiioonn sslloottss iinn yyoouurr ttooooll uussiinngg aa ssoofftt bbrruusshh oorr ddrryy
ccllootthh..
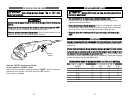
AACCCCEESSSSOORRIIEESS
UUssee oonnllyy aacccceessssoorriieess tthhaatt aarree rreeccoommmmeennddeedd bbyy tthhee mmaannuuffaaccttuurreerr ffoorr yyoouurr mmooddeell..
Accessories that may be suitable for one tool may become hazardous when used on
another tool.
AAllwwaayyss aat
tttaacchh ggrroouunnddeedd ((33--pprroonngg)) eexxtteennssiioonn ccoorrddss ttoo ggrroouunnddeedd ((33--hhoollee)) oouuttlleettss..
IIff yyoouu mmuusstt uussee aann eexxtteennssiioonn c
coorrdd,, bbee ssuurree tthhaatt tthhee ggaauuggee iiss llaarrggee eennoouugghh ttoo ccaarrrryy
tthhee aammoouunntt ooff ccuurrrreenntt nneecceessssaarryy ffoorr yyoouurr ppoowweerr
ttooooll..
If not, your tool may experi-
ence a loss of power, excessive voltage drop or overheating. The smaller the gauge
number, the heavier the cord (see table below).
RREECCOOMMMMEENNDDEEDD SSIIZZEESS OOFF EEXXTTEENNSSIIOONN CCOORRDDSS 112200 VVOOLLTT AACC 6600 HHZZ TTOOOOLLSS
TTOOOOLL CCUURRRREENNTT RRAATTIINNGG CCOONNDDUUCCTTOORR SSIIZZEE IINN AA..WW..GG
AMPERE 10FT. 25FT. 50FT. 100FT.
3-6 18 18 18 18
6-8 18 18 18 16
8-10 18 18 18 14
10-12 16 16 14 14
12-16 14 12 12 -
16-20 12 12 12 -
14
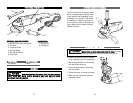
OOPPEERRAATTIINNGG TTHHEE OONN//OOFFFF SSWWIITTCCHH
NNeevveerr sswwiittcchh tthhee AAnnggllee GGrriinnddeerr ““OONN”” oorr ““OOFFFF”” wwhhiillee
uunnddeerr llooaadd ccoonnddiittiioon
nss..
AAllwwaayyss aallllooww tthhee AAnnggllee GGrriinnddeerr ttoo ccoommee uupp ttoo ffuullll ssppeeeedd bbeeffoorree ttoouucchhiinngg aannyy
ssuurrffaaccee..
AAllwwaayyss ttaakke
e tthhee ttooooll aawwaayy ffrroomm tthhee wwoorrkkppiieeccee bbeeffoorree ttuurrnniinngg tthhee ttooooll ““OOFFFF””..
Let the tool come to a complete stop before setting it down.
TThhiiss ttooooll ooppeerraatteess bbeesstt uunnddeerr lliiggh
htt pprreessssuurree..
Exerting heavy pressure will not
speed up the work and may cause damage to the motor.
Press the “ON/OFF” switch to start the tool.
To stop, release the “ON/OFF” switch.
When continuous operation is desired, press the “ON/OFF” switch forward and
depress the lock-on button. This locks the switch “ON” until the
lock-on button is released.
13
ON/OFF
SWITCH