


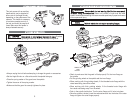

AATTTTAACCHHIINNGG WWHHEEEELLSS WWIITTHH DDEEPPRREESSSSEEDD CCEENNTTEERRSS
AAllwwaayyss cchheecckk tthhee ttooooll wwaarrnniinngg llaabbeell ffoorr tthhee rreeccoommmmeenndd--
eedd ssppeeeedd rraattiinngg oonn aacccceessssoorriieess..
Never run a wheel or brush over the rated
speed. Accessories exceeding the recommended speed may fly apart and cause
serious personal injury.
HHuubbbbeedd wwhheeeel
lss ddoo nnoott rreeqquuiirree mmoouunnttiinngg ffllaannggeess..
• Check to make sure that the guard is fitted properly. Put the inner flange on
the spindle.
• Put the grinding wheel on the spindle and the inner flange.
• When working with thin grinding wheels, fit the threaded outer flange with the
raised area facing toward the wheel.
• When working with thick grinding wheels, fit the threaded outer flange with
the raised area facing away from the wheel.
• Push in the spindle lock button. Turn the outer flange until it locks into place.
• Once the spindle is locked, insert the enclosed wrench into the holes of the outer
flange to tighten the outer flange properly.
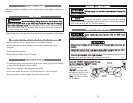
WARNING
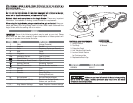
AATTTTAACCHHIINNGG AAUUXXIILLIIAARRYY HHAANNDDLLEE
This tool comes with an auxiliary
handle which can be attached to
either side of the Angle Grinder,
depending on the preference of the
operator. This handle is necessary
to maintain complete control of
the tool and should be used at all
times. Make sure this handle is
always fastened securely.
AATTTTAACCHHIINNGG WWHHEEEELL GGUUAARRDD
NNeevveerr bbrruusshh oorr ggrriinndd wwiitthhoouutt tthhee gguuaarrdd iinn ppllaaccee..
Brushes
are considered to be grinding wheels and must also be used with guards.
• Always unplug the tool before attempting to change the guard or accessories.
• Set the Angle Grinder on a flat surface with the spindle facing up.
• Place the spring washer of the guard over the spindle.
• Tighten the screw of the spring washer.
• Make sure that the guard is securely tightened in place.
9
SPINDLE
LOCK
BUTTON