


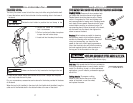

BBAALLAANNCCIINNGG
For best results, be sure to balance each accessory in the collet. Your tool’s high
RPM makes imbalances easily detectable as a wobble while the tool is running. To
balance an accessory:
1. Stop the tool.
2. Loosen the collet nut.
3. Rotate the accessory 1/4 turn.
4. Tighten the collet.
5. Run the tool.
6. Continue adjusting as needed. You will hear and feel when the accessory is
properly balanced.
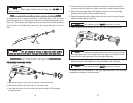
CCOONNNNEECCTTIINNGG FFLLEEXXIIBBLLEE SSHHAAFFTT TTOO TTOOOOLL
FFOORR MMOODDEELLSS 884400116688 AANNDD 884400116699::
NNeevveerr bbeenndd tthhee fflleexxiibbllee sshhaafftt wwiitthh aa rraaddiiuuss ooff lleessss tthhaann 66”” wwhheenn ooppeerraat
tiinngg..
Please store the flexible shaft in the designated compartment of the tool box
when not in use.
NNoott ffoorr uussee wwiitthh rroouutteerr bbiittss..
Use with router bits with cause kickback.
1. Remove spindle nut and collet nut from the tool by turning them counterclockwise.
2. Remove the collet from motor shaft.
3. Insert flexible shaft inner cable into the motor shaft until the stopper touches
the motor shaft.
4. Thread flexible shaft collet nut onto the motor shaft by turning it clockwise.
Tighten with collet wrench.
5. Thread flexible shaft nut onto the tool housing by turning it clockwise.
14
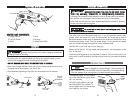
IINNSSEERRTTIINNGG//RREEMMOOVVIINNGG AACCCCEESSSSOORRIIEESS
AAllwwaayyss uunnpplluugg rroottaarryy ttooooll bbeeffoorree cchhaannggiinngg aacccceessssoorriieess,,
cchhaannggiinngg ccoolllleettss oorr sseerrvviicciinngg.. TThhee ttooooll ccoouulldd
ssttaarrtt uunneexxppeecctteeddllyy,, ccaauussiinngg
sseerriioouuss iinnjjuurryy..
TTOO LLOOOOSSEENN TTHHEE CCOOLLLLEETT NNUUTT::
1. Press the shaft lock button. Rotate the shaft manually until the lock engages
and prevents further rotation.
DDoo nnoott aatttteemmpptt ttoo eennggaaggee t
thhee sshhaafftt lloocckk wwhhiillee tthhee ttooooll iiss
rruunnnniinngg..
2. If the collet nut has a hexagonal shape, use a wrench to loosen the collet nut by
turning in the direction of the arrow labeled L in the illustration. The collet nut
must be loose in order to insert or remove accessories.
3. Remove the old accessory (if any) and install the new accessory, being sure to
push it as far as possible into the collet.
4. Tighten the collet nut by hand until snug.
5. Finish tightening the collet by turning the wrench in the direction of the arrow
labeled T in the illustration. Do not overtighten.
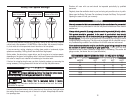
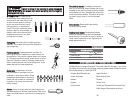
CCOOLLLLEETT SSIIZZEESS
Your rotary tool kit may have multiple collets to accommodate different accessories
with varying shank sizes.
TTOO CCHHAANNGGEE AA CCOOLLLLEETT::
1. Loosen the collet nut as described above, then remove the collet nut.
2. Remove the old collet.
3. Insert the loose collet.
4. Tighten the collet nut as described above.
Each collet has a series of rings on its shank that identify its size.
• 1/32” – one (1) ring
• 1/16” – two (2) rings
• 3/32” – three (3) rings
• 1/8” – no rings
13
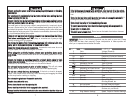
COLLET
COLLET NUT
FLEXIBLE
SHAFT