


- 3 -
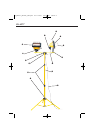
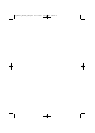
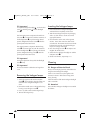
Description of the appliance
q
ON/OFF Switch
w
Floodlight lever
e
Halogen floodlight
r
Protective grill
t
Knurled screw
y
Crossbeam
u
Telescopic stand
i
Power cable
o
Knurled screw
a
Fixing ring
s
Distributor box
d
Knurled screw
f
Fixing screw
g
Glass cover
Assembly
ƽ
Danger of electrical shock
Never insert the plug into an electrical socket until
the appliance has been completely assembled.
ƽ
Danger of burns
Only touch the halogen lamps when they are in a
switched-off and cooled-down condition. The halo-
gen lamps will get very hot. Never touch the light-
bulb with bare hands, always use a clean and dry
lint-free cloth.
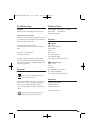
Opening up the pedestal base
➩ To set up the telescopic stand
u
, loosen the
knurled screw,
o
. The pedestal base can now
be opened out to the floor.
➩ Turn the knurled screw
o
until it is tight.
Assemble the protective grill
r
on to
the halogen spotlights
e
➩ Insert the lower pegs of the protective grill
r
into the recesses on the corners before the glass
covering
g
.
➩ Squeeze the protective grill
r
so far together
that the pegs on the other side of the protective
grill can be inserted into the recesses there.
➩ Do the same with the second halogen spotlight
Mounting the halogen floodlights
e
on the crossbeam.
➩ Insert the knurled screw
t
with the washer
through the hole in the bracket of the halogen
floodlight
e
.
➩ Insert the halogen floodlight
e
with the knurled
screw
t
in the pre-drilled hole on the crossbe-
am
y
. Ensure that the Stoppers are located be-
hind the halogen floodlights
e
.
➩ Turn the knurled screw
t
until it is tight.
Assembling the crossbeam on the
telescopic stand.
➩ Insert the knurled screw
d
first of all through the
hole in the distributer box
s
, then through the
hole in the crossbeam
y
.
➩ Now assemble the crossbeam
y
and the distri-
butor box
s
with the assistance of the knurled
screw
d
on the telescopic stand
u
.
➩ Turn the knurled screw
d
until it is tight.
Adjusting the height of the Stand
Halogen Floodlight
➩ Loosen the fixing ring
a
by turning it in an
anti-clockwise direction.
➩ Adjust the telescopic stand
u
to the desired
height.
➩ Retighten the fixing ring
a
by turning it in a clok-
kwise direction.
IB_KH4077_BK1968_LB6 30.11.2007 14:47 Uhr Seite 3