


14 GB/IE/CY
Operation
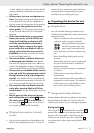
j Slide the mitre guide
8
evenly forward, see
fig. G. Saw the workpiece in one operation.
j Switch off the machine immediately if you are
not going to continue to use it.
Q
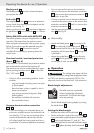
Setting the riving knife
WARNING!
The riving knife
3
is one of
the integrated safety devices and must always be
correctly installed. The distance between the outside
edge of the saw blade
4
and the riving knife
3
must be between 3 and 5 mm (see Fig. I).
j Turn the blade height adjustment wheel
14
to
raise the saw blade
4
fully and incline the
saw blade
4
at 45° using the blade angle
adjustment thumb knob
18
. Take off the blade
guard
2
.
j Remove the table insert
7
.
To do this, unscrew the two screws using a
cross-head screwdriver.
j Unscrew the fittings on the cover plate
23
and
swing the plate away. To do this it is necessary
to set the saw blade
4
inclination back to 0°.
j Loosen the screws and align the splitter
3
.
Retighten the screws.
j Attach the cover plate
23
, the table insert
7
and the blade guard
2
.
Q
Changing the saw blade
WARNING!
Before you carry out any work
on the device always pull the mains plug out of the
mains socket.
WARNING!
Wear protective gloves when
replacing the saw blade
4
. Even a stationary saw
blade can cut or cause injury.
j Wind the saw blade
4
upwards using the ad-
justment wheel
14
and incline it by 45° using
the blade angle adjustment thumb knob
18
.
j Take off the blade guard
2
.
j Remove the table insert
7
. To do this, unscrew
the two screws using a cross-head screwdriver.
j Unscrew the fittings on cover plate
23
to the
saw blade
4
and swing the plate away.
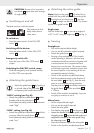
j Hold the saw blade
4
in position with the
counter key
10
and slacken the clamping screw
24
with the supplied combi-tool
11
, see Fig E
and Fig. M. Remove the clamping flange
25
.
j Remove the saw blade
4
.
j Clean the clamping surfaces.
j Place the new saw blade in position.
Only suitable saw blades are to be used.
See the sections “Technical information”.
Take note of the direction of rotation and the
correctly installed position of the saw blade.
Saw blades must be mounted properly. Ensure
that they are balanced, rotate smoothly and
cannot come loose.
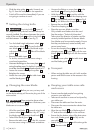
j Put on the clamping flange
25
and attach the
clamping screw
24
. Tighten fully with the com-
bi-tool
11
whilst holding it still with the counter
key
10
.
j Attach the cover plate
23
, the table insert
7
and the blade guard
2
.
Q
Transport
j When moving the table saw do it with another
person and hold the saw at the recesses in the
housing.
Q
Keeping your table saw safe
and secure
j Prevent unauthorised people from gaining
access to your table saw.
j Take care to see that no one can be injured by
your table saw.
j Disconnect the table saw from the mains.
j Disconnect the vacuum extraction device from
the table saw.
j Align the saw blade
4
to a blade angle of
0° and set the cutting depth to the minimum.
j Ensure that the bottom edge of the dust extrac-
tion cowl / blade guard
2
lies fully on the
saw table
5
.
j Attach the guide fence
1
and the mitre guide
8
to the saw table
5
.