


3
Basic Operation
Roteo 20HV/25H/35/35G - 1.2.0en
D
EN
F
I
E
P
NL
DK
S
N
FIN
J
CN
ROK
PL
H
RUS
CZ
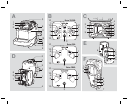
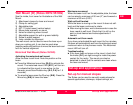
Laser Overview {A}
See the inside front cover for a diagram of the laser {A}
and keypad {B} corresponding to these callouts. See
separate descriptions of the motorized wallmount,
remote control and detector.
1) Rotating head
2) Aluminum head protection with axes indications
3) Plumb or square beam laser beam aperture
4) Rotating laser beam aperture
5) Index marks for alignment and 90°
6) Motorized wall or floor mount
7) Batteries
8) Jack for battery charger
9) 5/8"-11 Tripod mount for horizontal setup
10)5/8"-11 Tripod mount for vertical setup
11)Sensors for remote control signal
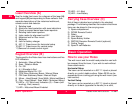
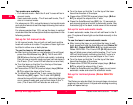
Keypad Overview {B}
The keypad for the Roteo laser has nine buttons and five
LED indicators.
1) Automatic / Manual Mode
2) Scan / Rotation Mode
3) On / Off
4) H.I. (Elevation) Alert
5) Motorized Mount On / Off
6) CCW Scan-Stationary Beam / Manual Slope
7) CW Scan-Stationary Beam / Manual Slope
8) Minus – Head Speed / Scan Width / Motorized Mount
9) Plus – Head Speed / Scan Width / Motorized Mount
10)LED’s – X/Y Axis Level Indicators (2) – Green (self-
leveling), Red (manual)
11)LED – Motorized Mount Enabled
12)LED – H.I. Alert
13)LED – Low Battery
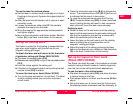
Carrying Case Overview {C}
Not all items indicated are included in the standard
package. The following identifies the locations that these
items can be placed in the carrying case.
1) Spare compartment
2) RC350 Remote Control
3) Roteo
4) User Manual
5) Spare Battery Holder
6) RRC350 Receiver-Remote Control (optional)
7) Ceiling Target
8) Spare D-cell Batteries
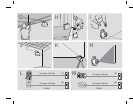
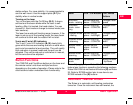
Basic Operation
How to use your Roteo
The wall mount and the metal head protection can both
be removed from the laser, if you wish to work without
these attachments.
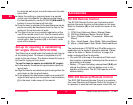
Horizontal Setup
The laser can be mounted on a 5/8"-11 tripod or placed
directly on a solid, stable surface. Roteo 20/35 can be
suspended from a ceiling grid using the wall mount (see
later section).
Vertical Setup
The laser can be mounted on a 5/8"-11 tripod or placed
directly on its back (opposite the handle) on a solid,