


GUIDELINES FOR
WELDING CAST
IRON
(CONT.)
blackboard chalk. After a few
minutes, even cracks not visible to the
naked eye are evident because the
kerosene from the cracks bleeds back
through the chalk.
Preparation for Welding - For weld
soundness, the cracks must be
properly prepared before welding. Drill
a hole at the end of each crack to
prevent it from extending further.
Grind, chip, machine or saw the crack
to create a bevel. Gas cutting or arc
gouging can be used on castings that
are preheated for welding. Be sure to
get to the bottom of the crack. On
sections more than 3/16” (4.8mm)
thick, bevel the edges so the root of
the joint is 1/8” (3.2mm) to 3/16”
(4.8mm) wide. If the crack extends
through the section, leave about a
1/8” (3.2mm) gap and 1/16” (1.6mm)
land.
Remove surface scale by grinding
wherever welds are to be placed.
Be sure the work is clean and dry.
Preheating drives moisture and oil
out of the casting.
Types of Electrodes to Use - For
machinable welds, use Softweld 99
Ni or Softweld 55 Ni. However, the
fusion line between Softweld deposits
and the cast iron may be too hard
to machine unless the casting is
preheated over 500°F. Ferroweld
deposits are not machinable.
Welding Techniques with
Preheating - Although the welding
of gray cast iron has been made to
sound “mysterious”, it can be readily
done if a few facts about the metal
and how it is made are understood.
Most of the difficulty is caused by the
high carbon content in cast iron -
usually between 2% and 4% carbon.
This fact, plus an understanding of
how cast iron is made, indicates the
heating-cooling cycles needed for
successful welding.
A gray iron casting is made by pouring
molten iron into a mold. It is allowed
to cool slowly. As it cools, the carbon
in the metal becomes a flaky form of
graphite. This graphite gives the iron
its characteristic gray color and some
of its properties.
When it is welded, part of the gray iron
is melted and an area adjacent to the
weld is raised above a temperature
called a critical temperature - about
1450°F. The mass of the casting
around the weld tends to draw the
heat from the weld area rapidly. If this
cooling of the heat-affected zone and
the weld is more rapid than it was
when the casting was originally made,
a highly brittle, crack-sensitive area
forms.
The best method to slow the cooling
rate is to preheat the casting to
prevent the iron from rapidly
absorbing heat from the weld area.
This requires a preheat temperature
between 500° and 1200°F. Do not
preheat over 1400°. Preheat
temperature can easily be determined
by using special heat indicating
crayons.
Preheat the entire casting slowly and
uniformly. Do not attempt to preheat
only the area to be welded.
Always use low currents for minimum
penetration and low ad-mixture. Weld
with short 3” (76.2mm) to 5” (127mm)
beads. Immediately after welding,
peen each bead to relieve stresses.
Be sure the preheat temperature is
maintained until the entire welding job
is completed. After welding, allow the
casting to cool slowly to room
temperature overnight just as it did
when it was originally made. To do
this, furnace cool or cover the casting
with dry sand, powdered lime, or a
fireproof blanket. This will produce a
strong, ductile deposit and fusion zone
which is relatively free of cracks.
Welding Techniques without
Preheat - Because of the size or other
problems, preheating the casting is
often impractical or impossible. In
such cases, the cracks can still be
repaired. Prepare the crack for
welding with the same methods
described previously.
When heat is applied suddenly to
glass, it cracks. In this way, cast iron
resembles glass. Cast iron should
never be welded cold.
When the high preheat temperatures
cannot be applied, heat the casting to
about 100°F. Do not try to weld
outdoors in cold weather. If the part
being welded is an engine block or
head, a uniform preheat can be
obtained by running the engine, if
possible, for a few minutes. Never
heat the casting so hot that you
cannot place your bare hand on it.
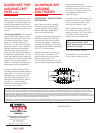
Make very short beads - not over
1” (25.4mm) long. Immediately peen
each bead while it is hot to relieve
shrinkage stresses and retard
cracking. While one bead is cooling,
deposit others at scattered points
throughout the joint. All weld craters
must be filled. Whenever possible,
this is done by ending a bead by
blending its crater into the start of a
previously deposited bead. All beads
should be deposited in the same
direction. Ends of adjacent parallel
beads should not line up with each
other.
Let each bead cool to the point where
it can be touched with a bare hand
before starting an adjacent bead.
Sealing Cracks - Because of the
nature of cast iron, tiny cracks tend to
appear next to the weld even when
11
55
22
33
66
44
1/16”
1/8”