


!&+,$$,!'&
##&#!&&*+ !$R(*'
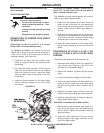
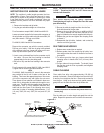
2. Fully push the brass connector end of the gun
cable into the brass adapter on the outgoing
side of the feeder wire drive. Secure the cable
using the hand screw, set screw, or pin.
3. Insert the control cable plug from the feeder trig-
ger circuit into the mating socket on the gun
cable feeder end handle. For machines with a
twist-lock trigger lead receptacle, if the L-Tec
gun control cable does not easily connect with
the socket, the gun control cable that came with
the K466-5 kit can be used. To do this, cut off
the gun control leads as close to the forked ter-
minals as possible and skin back the leads
7/16" (11 mm). Remove the twist-lock plug from
the L-Tec control cable and connect it to the
K466-5 cable. Make sure the outer jacket of the
connector is caught within the plug's strain
relief.
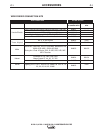
BAA86G<BAGB$<A6B?A/<E8@4G<6(BJ8E%!
B54EG+8E<8F8878EFBE+(,,LC8
8878EF
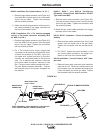
Gun cable assemblies which were assembled with a
K466-6, K466-7 or K466-9 Connection Kit in the
beginning of this Installation Section will connect eas-
ily to a feeder.
1. Check that the adapter and feeder outgoing
guide, as well as the drive rolls, are appropriate
for the electrode size being used.
2. Fully push the brass connector end of the gun
cable into the outgoing side of the feeder wire
drive. Secure the cable using the hand screw
on the wire feeder.
3. Insert the control cable plug from the feeder trig-
ger circuit into the mating socket on the gun
cable feeder end handle.
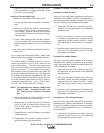
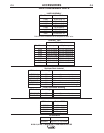
BAA86G<BAGB4,J86B474CG8798878E
1. Check that the drive roll(s) and feeder guide
tubes are appropriate for the electrode size
being used.
2. Fully push the brass connector end of the gun
cable into the conductor block on the outgoing
side of the feeder wire drive. Secure the cable
using the hand screw or set screw in the con-
ductor block.
3. Insert the round connector of the control cable
into the mating connector on the front of the
wire feeder.
BAA86G<BAGB4$<A6B?A98878E9BET7<4@8G8E
J<E8
1. Check that the drive roll(s) and feeder guide
tubes are appropriate for the electrode size
being used.
2. Fully push the brass connector end of the gun
cable into the conductor block on the outgoing
side of the feeder wire drive. Secure the cable
using the hand screw or set screw in the con-
ductor block.
3. Insert the round connector of the control cable
into the mating connector on the front of the
wire feeder.