


HOW
TO
USE
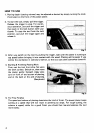
1.
Planing depth (cutting volume) may be adjusted
as
desired by simply turning the knob
(front grip) on the front of the power planer.
2.
To start the tool, simply pull the trigger.
Release
the trigger to stop. For contin-
uous operation, just pull the trigger and
then push in the lock button with your
thumb. To stop the tool from the lock
position, just pull the trigger again and
release
it.
3.
After
you
switch on the tool by pulling the trigger, wait until the planer
is
running
at
top speed before bringing
it
into contact with the wood. Planing will be easier if you
incline the workpiece in stationary fashion,
so
that you can plane somewhat downhill.
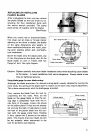
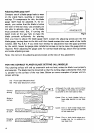
4.
Starting
&
Finishing Planing Work
First, rest the tool front shoe flat upon
the work surface. Switch on, then move
the planer gently forward. Appy pres-
sure on front
of
tool
at
start of planing,
and
at
the back
at
the end of planing.
(See
photo)
5.
For Fine Finishes
The speed and volume of planing determine the kind of finish. The power planer keeps
cutting
at
a
speed that will not result in jamming by chips. For rough cutting, the
volume
is
upped, while for
a
good finish you should but less and advance the tool
more slowly.
4