


15
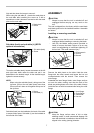
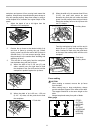
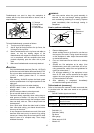
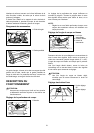
Featherboards are used to keep the workpiece in
contact with the rip fence and table as shown, and to
stop kickbacks.
1
2
3
4
006182
To install featherboards, proceed as follows:
4. Turn the tool off and unplug it.
5. Add 8" high flat facing board to the rip fence, the
full length of the rip fence.
6. Mount featherboards to the rip fence and table as
shown, so that the leading edges of the
featherboards will support the workpiece until the
cut is completed, and the workpiece has been
pushed completely past the cutter with a push
stick.
7. Make sure featherboards are securely attached.
CAUTION:
• Only the Makita dado head set (Part No. 191794-9)
should be used with Makita table saw Model 2704.
Do not use dado combinations wider than 21 mm
(13/16") or dados greater than 6" in outmost
diameter.
• After dadoing, ALWAYS replace the blade guard
with the spreader back in its original position on the
table saw.
• NEVER attempt bevel cuts when dadoing.
• NEVER dado if there is vibration (flutter) or a
strange noise.
• NEVER attempt dados in other than wood.
• Do not use the dado set for cut-offs.
• Feed work slowly, especially when cutting deep or
wide grooves or dados. If a deep cut is needed,
make several passes through the workpiece rather
than one deep, wide cut. Fast or abrupt feeds can
be dangerous.
• Use a push stick. When the dado head is hidden
from view while cutting, your hands should never
be on top of the stock.
• A very dangerous throwback can result if the wood
becomes stuck and you try to remove it by pulling
toward you. Always stop the tool and wait for dado
head to come to a complete stop. Then simply
withdraw the wood.
WARNING:
• Use extra caution when the guard assembly is
removed for any non-through sawing operation
such as dadoing, rabbeting or re-sawing. Replace
guard immediately after non-through sawing is
completed.
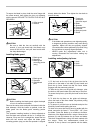
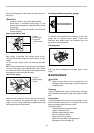
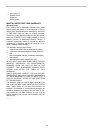
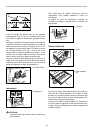
How to perform rabbeting
1
2
3
006183
1. Remove blade guard.
2. Attach auxiliary fence to rip fence for cuts that run
the length of the stock. Facing should be as high
as the workpiece is wide. Adjust fence and blade
to desired dimensions.
3. First cut: Hold board flat on table as in ordinary
ripping.
4. Second cut: Set workpiece on its edge. (Use
featherboards, push stick, push block and so on,
using precautions, safety rules and guidelines for
ripping or related work.)
5. For end-type rabbeting, if the workpiece is less
than 10-1/2" wide, rest the wood flat on the table
against the miter gauge (with wood facing). The
rip fence should not be used.
6. After rabbeting is completed, immediately
re-install the blade guard as before.
Table stand set (accessory)
Refer to the instruction manual for table saw stand that
is provided with the table saw stand as an optional
accessory.
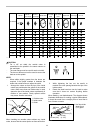
• Steel & Carbide-tipped saw blades
Table/Miter saw
blades
For general purpose cuts for table and miter saws.
Combination
General purpose blade for fast and smooth rip,
crosscuts and miters.
Fine cross cuts For sand-free cuts cleanly against the grain.
006586
• Sub table ( L)
• Sub table ( back)
• Rip fence
• Miter gauge
• Offset wrench 13-22
• Wrench 19
1. Rabbet
2. Second cut
3. First cut
1. C clamps
2. Facing board
3. Push stick
4. Featherboard