


5
CAUTION:
• Install the bit securely. Always use only the
wrenches provided with the tool. A loose or
overtightened bit can be dangerous.
• Do not tighten the collet chuck without inserting a
bit or install smaller shank bits without using a
collet sleeve. Either can lead to breakage of the
collet chuck.
Insert the bit all the way into the collet chuck and
withdraw it very slightly (approx. 2 mm). Then tighten the
collet chuck securely with the two wrenches. When
using smaller shank bits, first insert the appropriate
collet sleeve into the collet chuck, then install the bit as
mentioned above.
To remove the bit, follow the installation procedure in
reverse.
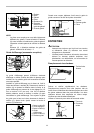
OPERATION
007438
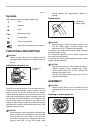
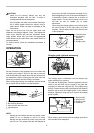
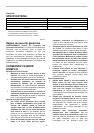
Set the tool base on the workpiece to be cut without the
bit making any contact. Then turn the tool on and wait
until the bit attains full speed. Move the tool forward over
the workpiece surface, keeping the tool base flush and
advancing smoothly until the cutting is complete.
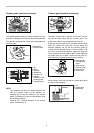
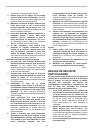
When doing edge cutting, the workpiece surface should
be on the left side of the bit in the feed direction.
1
2
3
4
4
2
001984
NOTE:
• Moving the tool forward too fast may cause a poor
quality of cut, or damage to the bit or motor.
Moving the tool forward too slowly may burn and
mar the cut. The proper feed rate will depend on
the bit size, the kind of workpiece and depth of cut.
Before beginning the cut on the actual workpiece, it
is advisable to make a sample cut on a piece of
scrap lumber. This will show exactly how the cut
will look as well as enable you to check
dimensions.
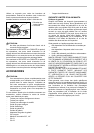
• When using the straight guide or the trimmer guide,
be sure to install it on the right side in the feed
direction. This will help to keep it flush with the side
of the workpiece.
1
2
3
4
001985
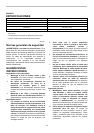
Straight guide (optional accessory)
005043
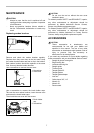
The straight guide is effectively used for straight cuts
when chamfering or grooving.
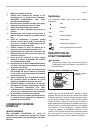
To install the straight guide, insert the guide bar into the
holes in the tool base until the notch in the guide bar
reaches just under the wing bolt (B). Then tighten wing
bolt (B). Loosen the wing bolt (A) and adjust the distance
between the bit and the straight guide. At the desired
distance, tighten the wing bolt (A) to secure the straight
guide in place.
12
3
4
005044
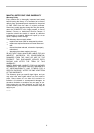
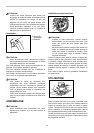
When cutting, move the tool with the straight guide flush
with the side of the workpiece.
1. Wing bolt (B)
2. Wing bolt (A)
3. Straight guide
4. Guide bar
1. Feed direction
2. Bit revolving
direction
3. Workpiece
4. Straight guide
1. Workpiece
2. Bit revolving direction
3. View from the top of the tool
4. Feed direction