7
10. Check lower guard for proper closing before
each use. Do not operate the saw if lower guard
does not move freely and close instantly. Never
clamp or tie the lower guard into the open posi-
tion. If saw is accidentally dropped, lower guard may
be bent. Raise the lower guard with the retracting
handle and make sure it moves freely and does not
touch the blade or any other part, in all angles and
depths of cut. To check lower guard, open lower
guard by hand, then release and watch guard clo-
sure. Also check to see that retracting handle does
not touch tool housing. Leaving blade exposed is
VERY DANGEROUS and can lead to serious per-
sonal injury.
11. Check the operation of the lower guard spring. If
the guard and the spring are not operating prop-
erly, they must be serviced before use. Lower
guard may operate sluggishly due to damaged
parts, gummy deposits, or a build-up of debris.
12. Lower guard should be retracted manually only
for special cuts such as “plunge cuts” and
“compound cuts.” Raise lower guard by retract-
ing handle and as soon as blade enters the
material, the lower guard must be released. For
all other sawing, the lower guard should operate
automatically.
13. Always observe that the lower guard is covering
the blade before placing saw down on bench or
floor. An unprotected, coasting blade will cause the
saw to walk backwards, cutting whatever is in its
path. Be aware of the time it takes for the blade to
stop after switch is released. Before setting the tool
down after completing a cut, be sure that the lower
guard has closed and the blade has come to a com-
plete stop.
14. Use the appropriate riving knife for the blade
being used. For the riving knife to work, it must be
thicker than the body of the blade but thinner than
the tooth set of the blade.
15. Adjust the riving knife as described in this
instruction manual. Incorrect spacing, positioning
and alignment can make the riving knife ineffective
in preventing kickback.
16. Always use the riving knife except when plunge
cutting. Riving knife must be replaced after plunge
cutting. Riving knife causes interference during
plunge cutting and can create kickback.
17. For the riving knife to work, it must be engaged
in the workpiece. The riving knife is ineffective in
preventing kickback during short cuts.
18. Do not operate the saw if riving knife is bent.
Even a light interference can slow the closing rate of
a guard.
19. Use extra caution when cutting damp wood,
pressure treated lumber, or wood containing
knots. Adjust speed of cut to maintain smooth
advancement of tool without decrease in blade
speed.
20. Avoid Cutting Nails. Inspect for and remove all
nails from lumber before cutting.
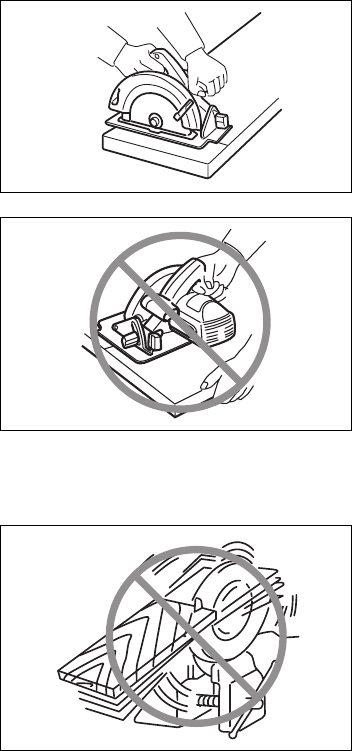
21. Place the wider portion of the saw base on that
part of the workpiece which is solidly supported,
not on the section that will fall off when the cut is
made. As examples, Fig. E illustrates the RIGHT
way to cut off the end of a board, and Fig. F the
WRONG way. If the workpiece is short or small,
clamp it down. DO NOT TRY TO HOLD SHORT
PIECES BY HAND! (Fig. E & F)
Fig. E
Fig. F
22. Never attempt to saw with the circular saw held
upside down in a vise. This is extremely danger-
ous and can lead to serious accidents. (Fig. G)
Fig. G
23. Some material contains chemicals which may be
toxic. Take caution to prevent dust inhalation
and skin contact. Follow material supplier safety
data.
24. Do not stop the blades by lateral pressure on the
saw blade.
25. Always use blades recommended in this manual.
Do not use any abrasive wheels.


